
文章目录
- 一、Openresty下载安装
- 二、设置环境变量
- 三、常用命令
- 四、入门案例
- 五、实践案例
- 1、lua-nginx-module
- 1)入门案例
- 2)获取Nginx uri中的单一变量
- 3)获取Nginx uri中的所有变量
- 2、Nginx缓存
- 1)Nginx全局共享内存缓存
- 2)lua-resty-lrucache
- 3)http_proxy 本地磁盘缓存
- 4、lua-resty-redis
- 5、redis2-nginx-module
- 总结
- 1、安装过程中,出现http://vault.centos.org/centos/7/extras/x86_64/repodata/repomd.xml: [Errno 14] HTTPS Error 404 - Not Found
- 2、使用redis2-nginx-module的时候,写了set方法,url传了key和val的值,但val为空
一、Openresty下载安装
官方地址:http://openresty.org/cn/linux-packages.html
安装过程,参考官方,按照下面步骤执行即可,如下:
CentOS 8 或者更老版本
# add the yum repo:
wget https://openresty.org/package/centos/openresty.repo
sudo mv openresty.repo /etc/yum.repos.d/openresty.repo# update the yum index:
sudo yum check-update然后就可以像下面这样安装软件包,比如 openresty:
sudo yum install -y openresty如果你想安装命令行工具 resty,那么可以像下面这样安装 openresty-resty 包:
sudo yum install -y openresty-resty
命令行工具 opm 在 openresty-opm 包里,而 restydoc 工具在 openresty-doc 包里头。
默认安装目录:/usr/local/openresty
二、设置环境变量
- 打开 ~/.bashrc 文件
vi ~/.bashrc - 在文件末尾添加以下内容,保存并退出文件
export PATH=/usr/local/openresty/nginx/sbin:$PATH - 使配置生效
source ~/.bashrc
三、常用命令
- 启动OpenResty:nginx 或 systemctl start openresty
- 停止OpenResty:nginx -s stop 或 systemctl stop openresty
- 重启OpenResty:systemctl restart openresty
- 检查OpenResty配置文件语法:nginx -t
- 查看OpenResty进程:ps -ef | grep nginx
- 查看OpenResty版本:nginx -v
- 查看OpenResty服务日志:sudo journalctl -u openresty
- 设置开机启动:systemctl enable openresty
- 重新加载配置文件:nginx -s reload 或 systemctl reload openresty 或 service openresty reload
四、入门案例
启动:systemctl start openresty
检查OpenResty的启动状态:systemctl status openresty

编辑配置文件vi /usr/local/openresty/nginx/conf/nginx.conf,清空其它内容,设置为下面内容,方便测试
worker_processes  1;
error_log logs/error.log;
events {worker_connections 1024;
}
http {server {listen 8080;location / {default_type text/html;content_by_lua_block {ngx.say("<p>hello, world</p>")}}}
}
重新加载配置:systemctl reload openresty
测试:curl http://localhost:8080/
[root@localhost ~]# curl http://localhost:8080/
<p>hello, world</p>
浏览器访问ip验证:http://yourIp:8080/

五、实践案例
接下来通过多个实践案例,来了解下可以实现啥功能
1、lua-nginx-module
1)入门案例
在/usr/local/openresty/nginx/conf/lua目录下,创建外部lua脚本hello.lua
ngx.say("<p>Hello, World!</p>")
在/usr/local/openresty/nginx/conf目录下,创建lua.conf
server {listen       80;server_name  localhost;location /lua {default_type text/html;content_by_lua_file /usr/local/openresty/nginx/conf/lua/hello.lua;}
}
在nginx.conf下引入lua配置,写在http模块中

重新加载配置,测试效果如下:
nginx -s reload
[root@localhost test]# curl http://localhost:80/lua
<p>Hello, World!</p>
2)获取Nginx uri中的单一变量
写在我们前面定义的server中即可,端口还是80
location /nginx_var {default_type text/html;content_by_lua_block {ngx.say(ngx.var.arg_name)}
}
测试效果如下,只能获取一个变量
[root@localhost test]# curl http://localhost:80/nginx_var?name=forlan
forlan
[root@localhost test]# curl http://localhost:80/nginx_var?name=forlan&id=1
[1] 15536
3)获取Nginx uri中的所有变量
写在我们前面定义的server中即可,端口还是80
location /nginx_var {default_type text/html;content_by_lua_block {local uri_args = ngx.req.get_uri_args()  for k, v in pairs(uri_args) do  if type(v) == "table" then  ngx.say(k, " : ", table.concat(v, ", "), "<br/>") else  ngx.say(k, ": ", v, "<br/>")  end  end}
}
测试效果如下,可以正常获取多个变量

2、Nginx缓存
1)Nginx全局共享内存缓存
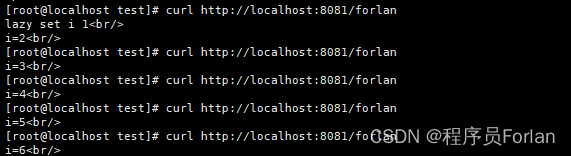
在Nginx配置中定义了一个共享字典,名为shared_data,大小为1MB,检查在共享字典中的变量i是否存在,如果不存在,就将其初始化为1,并存储到共享字典中。然后,将变量i的值增加1,并输出变量i的新值。这个过程是线程安全的,因为共享字典确保了在多进程环境中的数据一致性。
http {lua_shared_dict shared_data 1m;server {listen 8081;location /forlan {default_type text/html;content_by_lua_block {local shared_data = ngx.shared.shared_datalocal i = shared_data:get("i")if not i theni = 1shared_data:set("i", i)ngx.say("lazy set i ", i, "<br/>")endi = shared_data:incr("i", 1)ngx.say("i=", i, "<br/>")}}}
}
测试效果如下:
2)lua-resty-lrucache
Lua 实现的一个简单的 LRU 缓存,适合直接缓存较为复杂的 Lua 数据
相比 ngx_lua 共享内存字典可以省去较昂贵的序列化操作
相比 memcached 这样的外部服务又能省去较昂贵的 socket 操作
lrucache 有两种实现:
- resty.lrucache:适合用来缓存命中率高或读远远大于写操作的缓存业务
- resty.lrucache.pureffi:适合用来缓存命中率低或需要对key进行频繁增、删操作的缓存业务
下面我们以resty.lrucache来演示下:
在/usr/local/openresty/nginx/conf/lua目录下,创建外部lua脚本mycache.lua
local lrucache = require("resty.lrucache")
--创建一个新的LRU缓存实例,大小为200
local cache, err = lrucache.new(200)
if not cache then  ngx.log(ngx.ERR, "create cache error : ", err)
end  local function set(key, value, ttlInSeconds)  cache:set(key, value, ttlInSeconds)
end  local function get(key)  return cache:get(key)
end  local _M = {  set = set,  get = get
}
return _M
配置nginx.conf
worker_processes  1;
error_log logs/error.log;
events {worker_connections 1024;
}
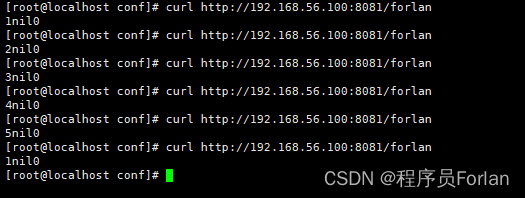
http {lua_package_path "/usr/local/openresty/nginx/conf/lua/?.lua;;";server {listen 8081;location /forlan {default_type text/html;content_by_lua_block {local mycache = require("mycache")local count = mycache.get("count") or 0count = count + 1mycache.set("count", count, 10)ngx.say(mycache.get("count"))}}}
}
测试效果如下:不断累加,过了10s,缓存失效,从0开始
3)http_proxy 本地磁盘缓存
http {  # 启用代理缓存  proxy_cache on;  # 指定代理缓存目录  proxy_cache_path /path/to/your/cache/directory levels=1:2 keys_zone=my_cache:10m max_size=10g inactive=60m use_temp_path=off;  # 定义代理缓存区域  proxy_cache_key $scheme$proxy_host$request_uri;  # 配置哪些请求不参与代理缓存  proxy_no_cache $request_uri;  # 其他Nginx配置项...
}
请确保将/path/to/your/cache/directory替换为你自己的实际磁盘缓存目录路径,并根据你的需求调整其他参数
4、lua-resty-redis
配置nginx.conf
server {listen 8082;location /forlan {default_type text/html;content_by_lua_block {local redis = require "resty.redis"  local red = redis:new()  local ok, err = red:connect("127.0.0.1", 6379) if not ok then  ngx.log(ngx.ERR, "failed to connect to Redis: ", err)  return ngx.exit(500)  end local ok, err = red:auth("root")  if not ok then  ngx.log(ngx.ERR, "failed to authenticate with Redis: ", err)  return ngx.exit(500)  endlocal res, err = red:get("forlan")ngx.say("res:",res)}}
}
重新加载配置,访问即可,如下,取到了Redis缓存的值
[root@localhost conf]# nginx -s reload
[root@localhost conf]# curl http://192.168.56.100:8082/forlan
res:xx
5、redis2-nginx-module
redis2-nginx-module是一个支持 Redis 2.0 协议的 Nginx upstream 模块,它可以让 Nginx 以非阻塞方式直接防问远方的 Redis 服务,同时支持 TCP 协议和 Unix Domain Socket 模式,并且可以启用强大的 Redis 连接池功能
提供一个set方法,通过url访问指定key和value,如:curl ”http://192.168.56.100:8082/set?key=forlan&val=2”
location = /set {
default_type text/html;redis2_pass 127.0.0.1:6379;redis2_query auth root;set_unescape_uri $key $arg_key;set_unescape_uri $val $arg_val;redis2_query set $key $val;
}
通过一个get方法,通过url访问获取key的值,如:curl “http://192.168.56.100:8082/get?key=forlan”
location = /get {
default_type text/html;redis2_pass 127.0.0.1:6379;redis2_query auth root;set_unescape_uri $key $arg_key;redis2_query get $key;
}
测试如下,试验成功
[root@localhost ~]# curl "http://192.168.56.100:8082/set?key=forlan&val=2"
+OK
+OK
[root@localhost ~]# curl "http://192.168.56.100:8082/get?key=forlan"
+OK
$1
2
很少使用这种的,因为复杂业务写起来很痛苦
总结
1、安装过程中,出现http://vault.centos.org/centos/7/extras/x86_64/repodata/repomd.xml: [Errno 14] HTTPS Error 404 - Not Found
进入目录:cd /etc/yum.repos.d
查看yum源:ll
重置:rm -f ${文件名}.repo
2、使用redis2-nginx-module的时候,写了set方法,url传了key和val的值,但val为空
location = /set {
default_type text/html;redis2_pass 127.0.0.1:6379;redis2_query auth root;set_unescape_uri $key $arg_key;set_unescape_uri $val $arg_val;redis2_query set $key $val;
}
上面这个配置这样写是没错的,错就错在访问的时候,我们使用了下面这种,忘记加了双引号,会导致val的值拿不到
curl http://192.168.56.100:8082/set?key=forlan&val=2
正确的访问方式应该是下面这种:
curl "http://192.168.56.100:8082/set?key=forlan&val=2"


![[C++]内存管理:串顺序存储的内存回收](http://pic.xiahunao.cn/yaotu/[C++]内存管理:串顺序存储的内存回收)

:ArkUI 首页仪表盘搭建)