Android View的 getHeight 和 getMeasuredHeight 的区别

前言
先简单复习一下Android View 的 绘制顺序:
1、onMeasure(测量),先根据构造器传进来的LayoutParams(布局参数),测量view宽高。
2、onLayout(布局),再根据测量出来的宽高参数,进行布局。
3、onDraw(绘制),最后绘制出View。
ps:案例中用到了dataBinding
1、使用LayoutParams改变View高度
效果:getHeight 和 getMeasuredHeight 的值是一样的,没有区别;
getWidth 和 getMeasuredWidth 也是同理。
bind.btn.setOnClickListener(new View.OnClickListener() {@Overridepublic void onClick(View v) {LinearLayout.LayoutParams params = (LinearLayout.LayoutParams) bind.textBox.getLayoutParams(); params.height += 10;bind.textBox.setLayoutParams(params);Log.d("TAG", "更新后 getHeight:" + bind.textBox.getHeight() + " --- getMeasuredHeight:" + bind.textBox.getMeasuredHeight());}});

2、使用layout改变View高度
效果:getHeight 的值在变化,而 getMeasuredHeight 的值没有变化,还是初始值。
getWidth 和 getMeasuredWidth 也是同理。
bind.btn.setOnClickListener(new View.OnClickListener() {@Overridepublic void onClick(View v) {bind.textBox.layout(bind.textBox.getLeft(),bind.textBox.getTop(),bind.textBox.getRight(),bind.textBox.getBottom() + 10);Log.d("TAG","更新后 getHeight:" + bind.textBox.getHeight() + " --- getMeasuredHeight:" + bind.textBox.getMeasuredHeight());}});
3、区别
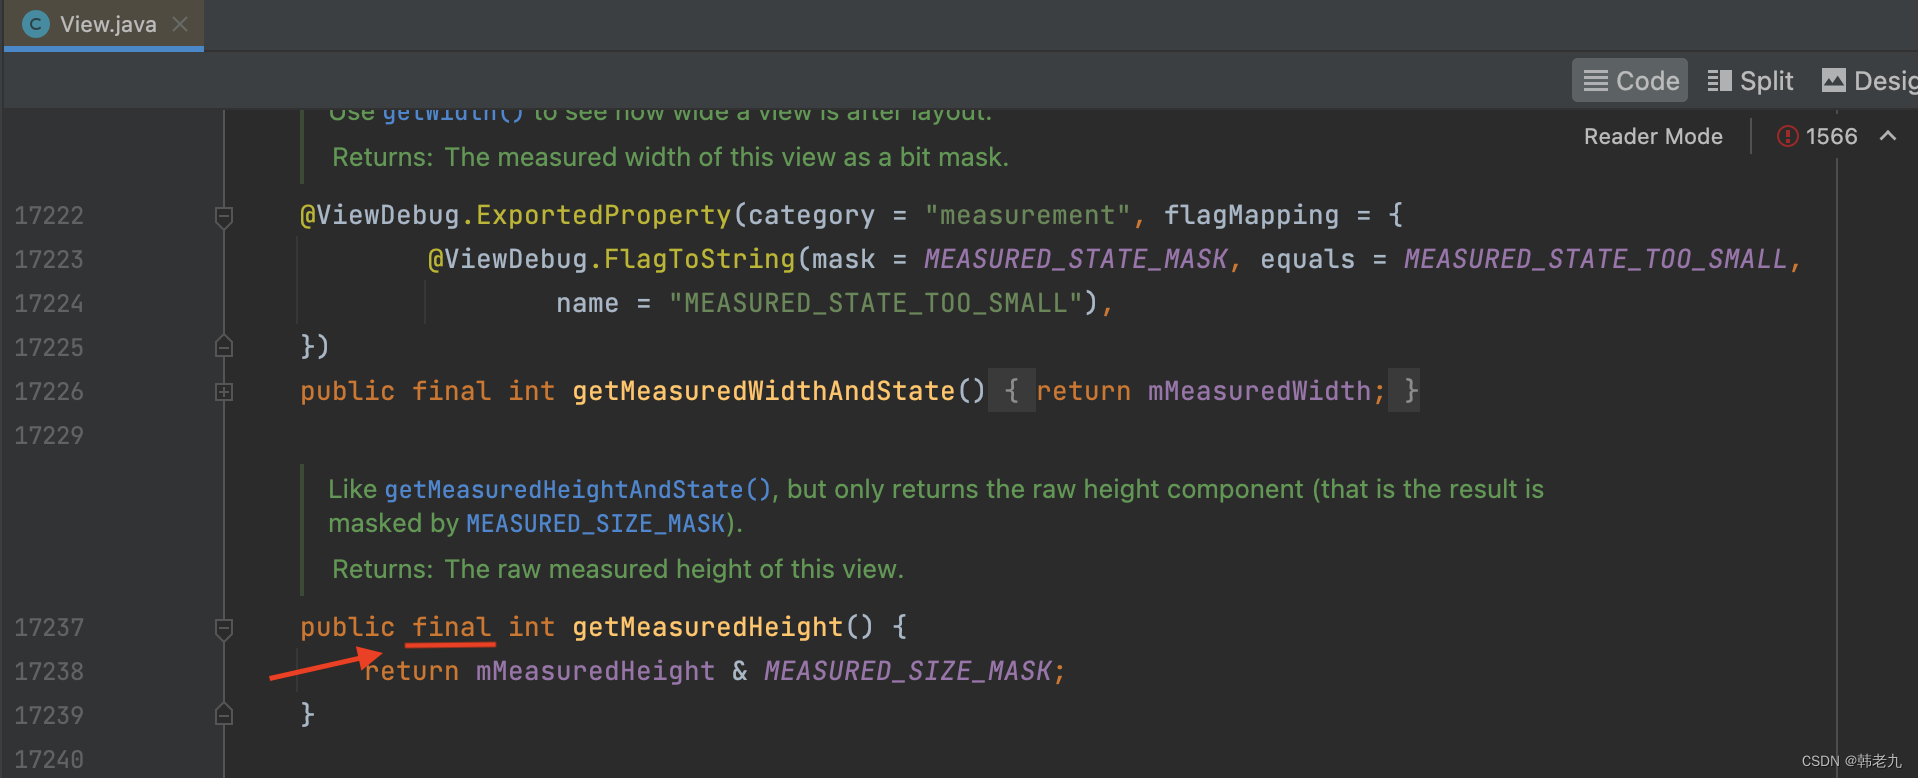
通过以上方式可以看出,使用layout可以改变View 宽或高 度,但并不会更新View原始测量值,即使使用requestLayout()也不行。
源码:因为它是final类型,不可重写。

4、两种获取宽高值的应用场景
1、View布局完成(就是View执行完onLayout),使用 getWidth / getHeight,这是View源码。
/*** Return the width of your view.** @return The width of your view, in pixels.*/@ViewDebug.ExportedProperty(category = "layout")public final int getWidth() {return mRight - mLeft;}/*** Return the height of your view.** @return The height of your view, in pixels.*/@ViewDebug.ExportedProperty(category = "layout")public final int getHeight() {return mBottom - mTop;}/*** Right position of this view relative to its parent.** @return The right edge of this view, in pixels.*/@ViewDebug.CapturedViewPropertypublic final int getRight() {return mRight;}/*** Left position of this view relative to its parent.** @return The left edge of this view, in pixels.*/@ViewDebug.CapturedViewPropertypublic final int getLeft() {return mLeft;}/*** Bottom position of this view relative to its parent.** @return The bottom of this view, in pixels.*/@ViewDebug.CapturedViewPropertypublic final int getBottom() {return mBottom;}/*** Top position of this view relative to its parent.** @return The top of this view, in pixels.*/@ViewDebug.CapturedViewPropertypublic final int getTop() {return mTop;}1.1、自定义View 运行结果
@Overrideprotected void onMeasure(int widthMeasureSpec, int heightMeasureSpec) {super.onMeasure(widthMeasureSpec, heightMeasureSpec);Log.d("TAG", "onMeasure --- getLeft:" + getLeft()); // 0Log.d("TAG", "onMeasure --- getTop:" + getTop()); // 0Log.d("TAG", "onMeasure --- getRight:" + getRight()); // 0Log.d("TAG", "onMeasure --- getBottom:" + getBottom()); // 0Log.d("TAG", "onMeasure --- getWidth:" + getWidth()); // 0Log.d("TAG", "onMeasure --- getHeight:" + getHeight()); // 0}@Overrideprotected void onLayout(boolean changed, int left, int top, int right, int bottom) {super.onLayout(changed, left, top, right, bottom);Log.d("TAG", "onMeasure --- getLeft:" + getLeft()); // 503Log.d("TAG", "onMeasure --- getTop:" + getTop()); // 871Log.d("TAG", "onMeasure --- getRight:" + getRight()); // 577Log.d("TAG", "onMeasure --- getBottom:" + getBottom()); // 923Log.d("TAG", "onMeasure --- getWidth:" + getWidth()); // 74 = 577 - 503Log.d("TAG", "onMeasure --- getHeight:" + getHeight()); // 52 = 923 - 871}2、反之View没有布局完,使用 getMeasuredWidth / getMeasuredHeight,比如在onCreate中使用可以获取 宽高值,如果在此 使用 getWidth / getHeight 返回会是0,因为此时还没有布局完成。
注意:在布局未完成前使用 getMeasuredWidth / getMeasuredHeight,要先主动通知系统测量,才会有值,如果布局已经完成,那就直接用,不需要这一步;
通知系统测量方法:measure(0,0),直接都写0就好,系统会返回正确的值。
@Overrideprotected void onCreate(Bundle savedInstanceState) {super.onCreate(savedInstanceState);bind = AppActivityMainBinding.bind(getLayoutInflater().inflate(R.layout.app_activity_main, null));setContentView(bind.getRoot());// 主动通知系统去测量bind.textBox的高度// 注意:在onCreate中,此时的布局还未完成,只有执行了这句代码,bind.textBox.getMeasuredHeight() 才会有值bind.textBox.measure(0,0);bind.showHeight.setText("getHeight:" + bind.textBox.getHeight() + " --- getMeasuredHeight:" + bind.textBox.getMeasuredHeight()); }5、使用layout改变View宽高,会引发的问题
前言提到,onLayout(布局)是根据测量出来的宽高参数,进行布局的,虽然在视觉上改变了宽高,但测量的宽高值还是原始值,没有改变;
而在Android布局体系中,父View负责刷新、布局显示子View,当子View需要刷新时,则是通知父View来完成,就是循环遍历调用子View的 measure / layout / draw 方法。
由此得出,当布局中某个子View布局发生改变,这个父View就开始循环遍历调用子View的layout,通过布尔值changed判断当前子View是否需要重新布局,changed为true表示当前View的大小或位置改变了 。
这时就会发现 之前通过layout改变宽高的View,会被还原。因为onLayout(布局)是根据测量出来的宽高参数,进行布局的,重要的话说三遍。
案例:
我新加了一个TextView,将值显示在屏幕上。
<TextViewandroid:id="@+id/show_height"android:layout_width="wrap_content"android:layout_height="wrap_content"/>
View没有发生改变?不,它改变了,但给TextView赋值后,TextView的宽高发生改变,通知父View刷新,父View开始循环遍历子View的layout方法,导致 通过layout改变宽高的View,又根据 原始测量值,重新布局还原了,由于执行的太快,所以视觉上看不到View这个过程。
日志:
20:29:39.933 D MTextView --- onLayout --- bottom:1127 --- changed:true
20:29:39.935 D 更新TextView,触发MTextView的 onLayout方法
20:29:39.973 D MTextView --- onLayout --- bottom:1117 --- changed:true
6、案例文件
MTextView.java
public class MTextView extends androidx.appcompat.widget.AppCompatTextView {public MTextView(@NonNull Context context) {super(context);}public MTextView(@NonNull Context context, @Nullable AttributeSet attrs) {super(context, attrs);}@Overrideprotected void onMeasure(int widthMeasureSpec, int heightMeasureSpec) {super.onMeasure(widthMeasureSpec, heightMeasureSpec);int heightPxValue = MeasureSpec.getSize(heightMeasureSpec);Log.d("TAG", "MTextView --- onMeasure --- heightPxValue:" + heightPxValue);}@Overrideprotected void onLayout(boolean changed, int left, int top, int right, int bottom) {super.onLayout(changed, left, top, right, bottom);Log.d("TAG", "MTextView --- onLayout --- bottom:" + bottom + " --- changed:" + changed);}
app_activity_main.xml
<?xml version="1.0" encoding="utf-8"?>
<layout xmlns:android="http://schemas.android.com/apk/res/android"xmlns:app="http://schemas.android.com/apk/res-auto"xmlns:tools="http://schemas.android.com/tools"><data></data><LinearLayoutandroid:layout_width="match_parent"android:layout_height="match_parent"android:gravity="center"android:orientation="vertical"tools:context=".ui.activity.AppMainActivity"><TextViewandroid:id="@+id/show_height"android:layout_width="wrap_content"android:layout_height="wrap_content"/><Buttonandroid:id="@+id/btn"android:layout_width="wrap_content"android:layout_height="wrap_content"android:text="update"android:textAllCaps="false" /><com.example.xxx.ui.view.MTextViewandroid:id="@+id/text_box"style="@style/Font_303133_15_bold"android:layout_width="200dp"android:layout_height="100dp"android:background="@color/color_66000000"android:gravity="center"android:text="hello world" /></LinearLayout></layout>
AppMainActivity.java
public class AppMainActivity extends AppCompatActivity {private AppActivityMainBinding bind;@Overrideprotected void onCreate(Bundle savedInstanceState) {super.onCreate(savedInstanceState);bind = AppActivityMainBinding.bind(getLayoutInflater().inflate(R.layout.app_activity_main, null));setContentView(bind.getRoot());// bind.btn.setOnClickListener(new View.OnClickListener() {// @Override// public void onClick(View v) {// LinearLayout.LayoutParams params = (LinearLayout.LayoutParams) bind.textBox.getLayoutParams(); // params.height += 10;// bind.textBox.setLayoutParams(params);// Log.d("TAG", "更新后 getHeight:" + bind.textBox.getHeight() + " --- getMeasuredHeight:" + bind.textBox.getMeasuredHeight());// }// });// bind.btn.setOnClickListener(new View.OnClickListener() {// @Override// public void onClick(View v) {// bind.textBox.layout(// bind.textBox.getLeft(),// bind.textBox.getTop(),// bind.textBox.getRight(),// bind.textBox.getBottom() + 10// );// Log.d("TAG","更新后 getHeight:" + bind.textBox.getHeight() + " --- getMeasuredHeight:" + bind.textBox.getMeasuredHeight());// }// });bind.btn.setOnClickListener(new View.OnClickListener() {@Overridepublic void onClick(View v) {bind.textBox.layout(bind.textBox.getLeft(),bind.textBox.getTop(),bind.textBox.getRight(),bind.textBox.getBottom() + 10);bind.showHeight.setText("getHeight:" + bind.textBox.getHeight() + " --- getMeasuredHeight:" + bind.textBox.getMeasuredHeight());Log.d("TAG","更新TextView,触发MTextView的 onLayout方法");}});}}总结
在View没有布局完成前,想要获取 宽高,使用 getMeasuredWidth / getMeasuredHeight,记得先通知系统测量;
反之只要显示在屏幕上,getWidth / getHeight 就能拿到值,还是时时数据。
补充一下,如果在xml中给View设置了visibility="gone",注意是xml,getWidth / getHeight 也拿不到值,如果是 visibility="invisible",不受影响。
再如果 在xml中给View设置了visibility="gone",在代码中设置成setVisibility(View.VISIBLE),第一次也拿不到值,因为还没有layout完成,之后就可以拿到了,后面再给它设置成setVisibility(View.GONE),也不会受影响,因为已经布局过了。代码在这,我都试过了,核心就是看View有没有onLayout完成。
Activity
@Overridepublic void onWindowFocusChanged(boolean hasFocus) {super.onWindowFocusChanged(hasFocus);Log.d("TAG", "getHeight:" + bind.btn.getHeight()); // 0new Handler().postDelayed(new Runnable() {@Overridepublic void run() {Log.d("TAG", "getHeight:" + bind.btn.getHeight()); // 0bind.btn.setVisibility(View.VISIBLE); // 设置显示Log.d("TAG", "getHeight:" + bind.btn.getHeight()); // 0}}, 2000);new Handler().postDelayed(new Runnable() {@Overridepublic void run() {Log.d("TAG", "getHeight:" + bind.btn.getHeight()); // 126bind.btn.setVisibility(View.GONE); // 设置消失Log.d("TAG", "getHeight:" + bind.btn.getHeight()); // 126}}, 5000);new Handler().postDelayed(new Runnable() {@Overridepublic void run() {Log.d("TAG", "getHeight:" + bind.btn.getHeight()); // 126}}, 8000);}Xml
<Buttonandroid:id="@+id/btn"android:visibility="gone"android:layout_width="wrap_content"android:layout_height="wrap_content"android:text="update"android:textAllCaps="false" />