搭建spring security oauth2认证授权服务器

前言
下面是在spring security项目的基础上搭建spring security oauth2认证授权服务器
1、添加依赖
spring security oauth2认证授权服务器主要需要以下依赖
<dependency><groupId>org.springframework.boot</groupId><artifactId>spring-boot-starter-security</artifactId>
</dependency><!-- for OAuth 2.0 -->
<dependency><groupId>org.springframework.security.oauth</groupId><artifactId>spring-security-oauth2</artifactId><version>{oauth2_version}</version>
</dependency>
Spring Security对OAuth2默认可访问端点
/oauth/authorize :申请授权码code,涉及类 AuthorizationEndpoint
/oauth/token :获取令牌token,涉及类 TokenEndpoint
/oauth/check_token :用于资源服务器请求端点来检查令牌是否有效,涉及类 CheckTokenEndpoint
/oauth/confirm_access :用于确认授权提交,涉及类 WhitelabelApprovalEndpoint
/oauth/error :授权错误信息,涉及 WhitelabelErrorEndpoint
/oauth/token_key :提供公有密匙的端点,使用JWT令牌时会使用,涉及类 TokenKeyEndpoint
2、创建认证授权配置类
认证授权服务器最重要的就是认证授权配置类的配置
1、创建 一个自定义 类继承 AuthorizationServerConfigurerAdapter
2、在 自定义 类上添加注解@Configuration和@EnableAuthorizationServer注解
@Configuration
@EnableAuthorizationServer
public class AuthorizationServerConfig extends AuthorizationServerConfigurerAdapter {@AutowiredPasswordEncoder passwordEncoder;@AutowiredAuthenticationManager authenticationManager;/*** 密码模式需要注入authenticationManager* @param endpoints*/@Overridepublic void configure(AuthorizationServerEndpointsConfigurer endpoints) throws Exception {endpoints.authenticationManager(authenticationManager);}@Overridepublic void configure(AuthorizationServerSecurityConfigurer security) throws Exception {security.tokenKeyAccess("permitAll()").checkTokenAccess("isAuthenticated()")//让/oauth/token支持client_id以及client_secret作登录认证.allowFormAuthenticationForClients();}/*** 客户端信息配置* @param clients* @throws Exception*/@Overridepublic void configure(ClientDetailsServiceConfigurer clients) throws Exception {clients.inMemory()//客户端ID.withClient("admin")//客户端密码.secret(passwordEncoder.encode("123123"))//配置访问token的有效期.accessTokenValiditySeconds(3600)//配置重定向的跳转,用于授权成功之后的跳转.redirectUris("http://www.baidu.com")//授权范围标识,哪部分资源可访问(all是标识,不是代表所有).scopes("all")//授权模式, 可同时支持多种授权类型.authorizedGrantTypes("authorization_code", "password", "implicit","client_credentials","refresh_token")//true为自动批准,不需要用户手动点击授权,直接返回授权码.autoApprove(true);}@Beanpublic PasswordEncoder passwordEncoder(){return  new BCryptPasswordEncoder() ;}}
3、创建安全配置类
1、创建 一个自定义 类继承 WebSecurityConfigurerAdapter
2、在 自定义 类上添加注解@Configuration和@EnableWebSecurity注解
/*** 配置Web应用程序的安全性,包括定义哪些URL需要被保护(即需要进行身份验证),以及如何进行身份验证等*/
@Configuration
@EnableWebSecurity
public class OAuth2SecurityConfig  extends WebSecurityConfigurerAdapter {@Autowiredprivate PasswordEncoder passwordEncoder;@Overrideprotected void configure(AuthenticationManagerBuilder auth) throws Exception {//创建一个登录用户auth.inMemoryAuthentication().withUser("admin").password(passwordEncoder.encode("123123")).authorities("admin_role");}@Overrideprotected void configure(HttpSecurity http) throws Exception {//关闭CSRFhttp.csrf().disable().authorizeRequests().antMatchers("/auth/**", "/login/**").permitAll().anyRequest().authenticated().and().formLogin().permitAll();}@Bean@Overridepublic AuthenticationManager authenticationManagerBean() throws Exception {// 采用密码授权模式需要显式配置AuthenticationManagerreturn super.authenticationManagerBean();}}
4、获取授权码路径及参数
获取授权码的请求url:/oauth/authorize
参数列表如下
client_id:客户端准入标识。
response_type:授权码模式固定为code。
scope:客户端权限。
grant_type:授权类型,填写authorization_code,表示授权码模式
code:授权码,就是刚刚获取的授权码,注意:授权码只使用一次就无效了,需要重新申请。
redirect_uri:跳转uri,当授权码申请成功后会跳转到此地址,并在后边带上code参数
1、使用以下地址申请授权码
http://localhost:8080/oauth/authorize?client_id=test&response_type=code&grant_type=authorization_code&scop=all&redirect_uri=http://www.baidu.com
2、访问后,会让我们进行登录,登录成功之后就会跳转到我们的redirect_uri地址,并携带上了授权码
如下:fJf571就是我们的授权码
https://www.baidu.com/?code=fJf571
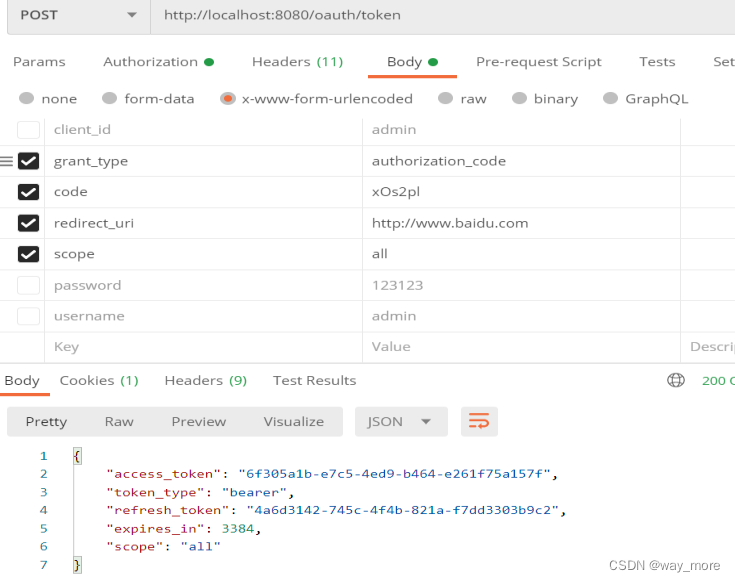
3、获取授权码之后,客户端就可以拿着授权码向授权服务器索要访问access_token
获取token的地址为:/oauth/token
参数列表如下:
client_id:客户端准入标识。
client_secret:客户端秘钥。
grant_type:授权类型,填写authorization_code,表示授权码模式
code:授权码,就是刚刚获取的授权码,注意:授权码只使用一次就无效了,需要重新申请。
redirect_uri:申请授权码时的跳转url,一定和申请授权码时用的redirect_uri一致
scope: 权限
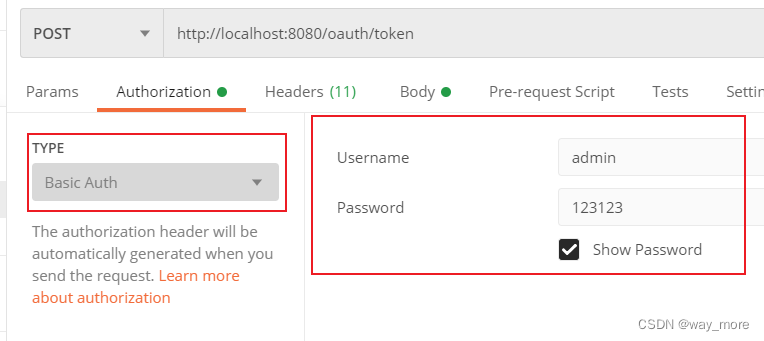
postman测试
在authorization里添加一个basic auth,username为client_id,password为secret
添加好认证信息之后,就可以请求接口了,下面就是授权模式下的获取token
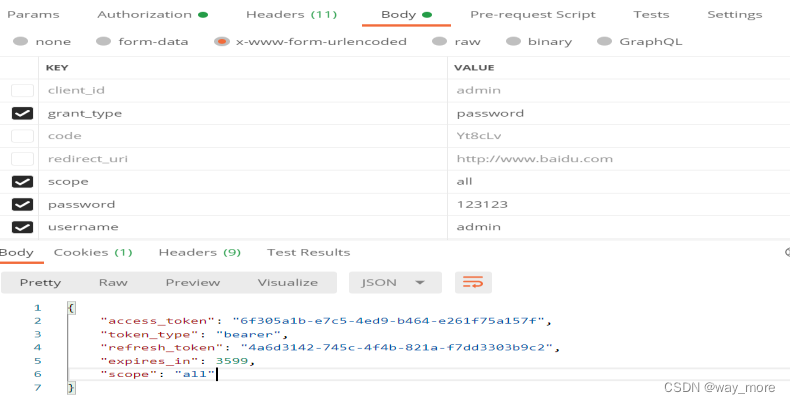
密码模式
使用密码模式,主要是要注入authenticationManagerBean类
(1)资源拥有者将用户名、密码发送给客户端
(2)客户端拿着资源拥有者的用户名、密码向授权服务器请求令牌(access_token),请求如下:
使用密码模式,我只需要请求获取token的url:/oauth/token
参数列表如下:
参数 说明
client_id 客户端ID
client_secret 客户端秘钥。
grant_type 授权类型,填写password表示密码模式
username 资源拥有者用户名。
password 资源拥有者密码
scope 权限