将 Vue 3 + Vite + TS 项目打包为 .exe 文件

使用 electron-builder打包:
一、安装依赖
npm install electron electron-builder --save-dev
二、创建 Electron 入口文件:在项目根目录下创建 electron/main.js 文件
import { app, BrowserWindow } from 'electron';
import path from 'path';
import { fileURLToPath } from 'url';// 兼容 ESM 的 __dirname
const __dirname = path.dirname(fileURLToPath(import.meta.url));let win: BrowserWindow | null = null;function createWindow() {win = new BrowserWindow({width: 1920,height: 1080,webPreferences: {nodeIntegration: true,contextIsolation: false,},});// 开发环境下加载 Vite 开发服务器if (process.env.NODE_ENV === 'development') {win.loadURL('http://localhost:5173');win.webContents.openDevTools();} else {// 生产环境下加载打包后的文件win.loadFile(path.join(__dirname, '../dist/index.html'));}
}app.whenReady().then(createWindow);// 所有窗口关闭时退出应用(macOS 除外)
app.on('window-all-closed', () => {if (process.platform !== 'darwin') app.quit();
});// macOS 下点击 Dock 图标重新打开窗口
app.on('activate', () => {if (BrowserWindow.getAllWindows().length === 0) createWindows();
});// 只在开发模式下启用热重载
if (process.env.NODE_ENV === 'development') {// 开发模式下的热重载逻辑require('electron-reload')(__dirname, {electron: path.join(__dirname, '..', 'node_modules', '.bin', 'electron'),});
}
三、修改 package.json:添加/修改以下配置:
{"main": "electron/main.js","scripts": {"electron:serve": "vite build && electron .","electron:build": "vite build && electron-builder --dir"},"build": {"productName": "test","files": ["dist/**/*","electron/**/*"],"win": {"target": "nsis"},"mac": {"target": "dmg"},"linux": {"target": "AppImage"}}
}
四、构建应用
npm run electron:build
可能会遇到的问题:
1、打包过程中出现下载资源失败:
(1)可以使用淘宝镜像下载
(2)可以直接复制下载失败的链接,然后手动下载后,粘贴到电脑C盘%LOCALAPPDATA%\electron-builder\Cache路径下
2、打包后点击.exe出现白屏或黑屏:
这里一定要改路由模式为hash模式,我之前写的是createWebHistory打包后是黑屏,改成createWebHashHistory就好了
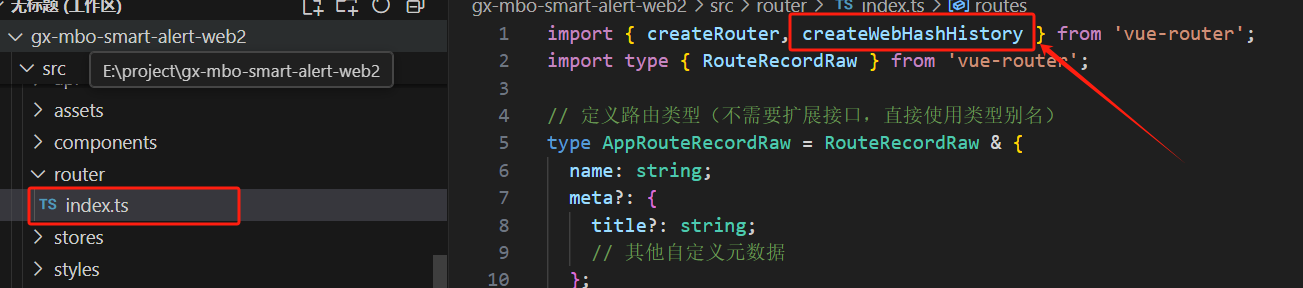

3、如果前端有多个页面显示,页面之间没有点击按钮的跳转,是通过改地址栏路由的方式打开的,那么electron打包后点击,exe只会显示首页,又不像浏览器一样可以改地址栏怎么办:
修改electron/main.js文件,在main.js 中启动两个窗口,分别加载两个地址就可以实现,点击.exe同时打开两个窗口,以下是修改的代码
import { app, BrowserWindow } from 'electron';
import path from 'path';
import { fileURLToPath } from 'url';// 兼容 ESM 的 __dirname
const __dirname = path.dirname(fileURLToPath(import.meta.url));let mainWin;    // 页面1
let faultWin;   // 页面2async function createWindows() {//页面1mainWin = new BrowserWindow({width: 1920,height: 1080,webPreferences: {nodeIntegration: true,contextIsolation: false,},});//页面2faultWin = new BrowserWindow({width: 1920,height: 1080,webPreferences: {nodeIntegration: true,contextIsolation: false,},});// 加载页面if (process.env.NODE_ENV === 'development') {await mainWin.loadURL('http://localhost:3000');await faultWin.loadURL('http://localhost:3000/#/fault-recognition');} else {await mainWin.loadFile(path.join(__dirname, '../dist/index.html'));await faultWin.loadFile(path.join(__dirname, '../dist/index.html'), {hash: '#/fault-recognition',});}// 可选:开发时自动打开 DevTools(可以去掉)mainWin.webContents.openDevTools();faultWin.webContents.openDevTools();
}// 启动应用
app.whenReady().then(createWindows);// 所有窗口关闭时退出应用(macOS 除外)
app.on('window-all-closed', () => {if (process.platform !== 'darwin') app.quit();
});// macOS 下点击 Dock 图标重新打开窗口
app.on('activate', () => {if (BrowserWindow.getAllWindows().length === 0) createWindows();
});