基于clangd和LSP协议生成Apollo9.0工程函数调用关系图

基于clangd和LSP协议生成Apollo9.0工程函数调用关系图
- 一、背景与动机
- 二、技术原理
- 2.1 LSP协议(Language Server Protocol)
- 2.2 clangd语言服务器
- 2.3 系统架构设计
- 三、实现方案
- 3.1 调用关系生成算法
- 3.2 核心LSP请求流程
- 四、环境配置与操作步骤
- 4.1 系统要求
- 4.2 依赖安装
- 升级GLIBC(必需)
- 安装`Python 3.10`
- 编译安装`clangd`
- 安装`Redis`
- 安装`Python`依赖
- 4.3 服务端实现(`lsp_server.py`)
- 4.4 客户端实现(`lsp_client.py`)
- 五、可视化结果
- 5.1 `Graphviz`输出`call_graph.png`
- 5.2 `Mermaid`图表转`SVG`
- 六、应用场景与优势
- 6.1 典型应用
- 6.2 技术优势
- 七、总结
一、背景与动机
在大型C++项目(如Apollo9.0自动驾驶平台)中,理解函数调用关系对于代码维护和优化至关重要。虽然现代IDE(如VSCode)提供了基本的调用层次功能,但在面对数百万行代码的复杂工程时,这些工具存在明显局限性:
- 可视化不足:IDE通常只能展示单层调用关系,无法生成完整的调用关系树
- 跨文件分析困难:大型工程中函数调用常跨越多个文件/模块
- 递归深度限制:无法完整展示深层嵌套的调用链
本文介绍一种基于clangd语言服务器和LSP协议的解决方案,通过编程方式构建完整的函数调用关系图,适用于Apollo等大型C++工程。
二、技术原理
2.1 LSP协议(Language Server Protocol)
LSP是微软提出的标准化协议,用于编辑器与语言服务器间的通信。它定义了代码分析、补全、导航等功能的统一接口。关键特性包括:
- 基于JSON-RPC的通信机制
- 支持代码导航(定义/引用查找)
- 提供调用层次(Call Hierarchy)接口
2.2 clangd语言服务器
clangd是LLVM项目的一部分,专为C/C++设计的高性能语言服务器:
- 基于Clang的精确代码解析能力
- 支持代码补全、错误检查、跳转定义
- 实现完整的LSP协议支持
2.3 系统架构设计
系统分为三个核心组件:
- 客户端:发起LSP请求,构建调用关系图
- 服务端:维持clangd进程,处理通信
- Redis:实现进程间通信(IPC)
三、实现方案
3.1 调用关系生成算法
def generate_call_graph(target_function):# 1. 准备调用层次结构prepare_call_hierarchy(target_function)# 2. 查询被调用函数(outgoing calls)outgoing = get_outgoing_calls(target_function)# 3. 查询调用者函数(incoming calls)incoming = get_incoming_calls(target_function)# 4. 递归构建调用树for caller in incoming:generate_call_graph(caller) # 递归分析调用者for callee in get_outgoing_calls(caller):add_edge(caller, callee) # 添加调用者->被调用者关系# 5. 生成可视化图表render_graph()
3.2 核心LSP请求流程
-
初始化连接
# 初始化LSP连接 initialize_params = {"processId": None,"rootUri": None,"capabilities": {} } send_request("initialize", initialize_params, 1) -
打开目标文件
did_open_params = {"textDocument": {"uri": "file:///path/to/file.cc","languageId": "cpp","version": 1,"text": file_content} } send_notification("textDocument/didOpen", did_open_params) -
查询调用关系
# 准备调用层次
prepare_params = {"textDocument": {"uri": file_uri},"position": {"line": 42, "character": 5}
}
call_item = send_request("textDocument/prepareCallHierarchy", prepare_params)# 获取incoming calls
incoming_calls = send_request("callHierarchy/incomingCalls", {"item": call_item})# 获取outgoing calls
outgoing_calls = send_request("callHierarchy/outgoingCalls", {"item": call_item})
四、环境配置与操作步骤
4.1 系统要求
- 基于Apollo9.0 Docker环境
4.2 依赖安装
升级GLIBC(必需)
# 检查当前GLIBC版本
strings /lib/x86_64-linux-gnu/libc.so.6 | grep GLIBC_# 添加安全更新源
sudo su -c 'echo "deb http://security.debian.org/debian-security buster/updates main" >> /etc/apt/sources.list' root# 安装密钥并更新
sudo apt-key adv --keyserver keyserver.ubuntu.com --recv-keys 112695A0E562B32A 54404762BBB6E853
sudo apt update -y
sudo apt install libc6 libc6-dev -y# 验证升级结果
strings /lib/x86_64-linux-gnu/libc.so.6 | grep GLIBC_ | tail -n 2
输出
GLIBC_2.28
GLIBC_PRIVATE
安装Python 3.10
wget https://www.python.org/ftp/python/3.10.0/Python-3.10.0.tgz
tar xzf Python-3.10.0.tgz
cd Python-3.10.0
./configure --enable-optimizations
make install# 安装pip
curl -sS https://bootstrap.pypa.io/get-pip.py | python3.10
编译安装clangd
# 安装构建依赖
wget https://github.com/Kitware/CMake/releases/download/v3.20.0-rc5/cmake-3.20.0-rc5-linux-x86_64.sh
bash cmake-3.20.0-rc5-linux-x86_64.sh --prefix=/usr/local/ --skip-license
apt install ninja-build -y# 编译LLVM/clangd
git clone https://github.com/llvm/llvm-project.git
cd llvm-project
git checkout llvmorg-20.1.0-rc3
mkdir build && cd build
/usr/local/bin/cmake -G Ninja -DCMAKE_BUILD_TYPE=Release \-DLLVM_ENABLE_PROJECTS="clang;clang-tools-extra" \-DLLVM_DISTRIBUTION_COMPONENTS="clangd;clang-resource-headers" \../llvm
ninja install-distribution
/usr/local/bin/clangd --version
输出
clangd version 20.1.0-rc3 (https://github.com/llvm/llvm-project.git a69568efe6c4972e71af295c6577b3412dd57c22)
Features: linux
Platform: x86_64-unknown-linux-gnu
安装Redis
wget -O redis-8.0.0.tar.gz https://github.com/redis/redis/archive/refs/tags/8.0.0.tar.gz
tar -xf redis-8.0.0.tar.gz
cd redis-8.0.0
make
kill -9 `pidof redis-server`
./src/redis-server --daemonize yes # 后台运行
安装Python依赖
pip3.10 install graphviz
pip3.10 install redis
4.3 服务端实现(lsp_server.py)
cd /apollo
cat > lsp_server.py <<-'EOF'
import subprocess
import time
import os
import threading
import sys
import redis
import json# Redis配置
pool = redis.ConnectionPool(host='localhost', port=6379, db=0,decode_responses=True
)
r = redis.Redis(connection_pool=pool)
running=False  # 服务器运行状态标志# LSP协议消息构造器
# method: RPC方法名
# params: 方法参数
# id_: 可选的消息ID
# 返回符合LSP协议格式的字符串
def make_lsp_message(method, params, id_=None):"""构造符合LSP协议的消息格式"""req = {}if id_ is not None:req['id'] = id_req['jsonrpc'] = "2.0"req['method'] = methodreq['params'] = paramsbody = json.dumps(req)content_length = len(body.encode('utf-8'))return f"Content-Length: {content_length}\r\n\r\n{body}"# 标准输入读取线程
# 通过Redis订阅STDIN频道获取输入数据
# 将接收到的数据写入clangd进程的标准输入
def redis_reader(process):"""从Redis读取消息并转发给clangd"""pubsub = r.pubsub()pubsub.subscribe("STDIN")for message in pubsub.listen():if message['type'] == 'message':process.stdin.write(message['data'].encode())process.stdin.flush()# 标准输出处理线程
# 持续读取clangd进程的输出并解析LSP协议格式
# 将完整消息体通过Redis发布到STDOUT频道
def clangd_writer(process): """处理clangd输出并发布到Redis""" buffer = b""global runningwhile True:try:chunk = process.stdout.read(1)if not chunk:breakbuffer += chunk# 检测消息头结束标记if b"\r\n\r\n" in buffer:header, rest = buffer.split(b"\r\n\r\n", 1)headers = header.decode()length = 0for line in headers.split("\r\n"):if line.lower().startswith("content-length:"):length = int(line.split(":")[1].strip())if len(rest) >= length:body = rest[:length]buffer = rest[length:]                    if running:r.publish("STDOUT",body)except Exception as e:print("read_messages error:", e)break# 启动clangd进程
# 使用预编译数据库目录/apollo
clangd_cmd = ["/usr/local/bin/clangd","--compile-commands-dir=/apollo"]
process = subprocess.Popen(clangd_cmd,stdin=subprocess.PIPE,stdout=subprocess.PIPE,stderr=sys.stderr,bufsize=0)# LSP初始化流程
# 1. 发送initialize请求
# 2. 等待5秒初始化完成
# 3. 发送initialized通知
def send_request(method, params, id_):msg = make_lsp_message(method, params, id_)process.stdin.write(msg.encode())process.stdin.flush()# 启动读写线程
writer_thread = threading.Thread(target=clangd_writer, args=(process,))
writer_thread.daemon = True
writer_thread.start()reader_thread = threading.Thread(target=redis_reader, args=(process,))
reader_thread.daemon = True
reader_thread.start()#初始化LSP
initialize_params = {"processId": None, "rootUri": None, "capabilities": {}}
send_request("initialize", initialize_params, 1)
time.sleep(5)notify_msg = make_lsp_message("initialized", {}, None)
process.stdin.write(notify_msg.encode())
process.stdin.flush()
time.sleep(5)
running=Trueprint("LSP服务端已启动,等待请求...")
while True:time.sleep(1) # 保持主线程运行
EOF
python3.10 lsp_server.py
4.4 客户端实现(lsp_client.py)
cd /apollo
cat > lsp_client.py <<-'EOF'
import subprocess
import threading
import json
import sys
import queue
import time
import graphviz
import os
from collections import deque, defaultdict
import redis
import graphviz# Redis配置
pool = redis.ConnectionPool(host='localhost', port=6379, db=0,decode_responses=True
)
r = redis.Redis(connection_pool=pool)def char_to_utf16_offset(s, char_index):"""将字符索引转换为UTF-16偏移量(LSP要求)    Args:s: 原始字符串char_index: 字符位置索引(从0开始)Returns:int: UTF-16编码的偏移量(LSP协议要求)"""substring = s[:char_index]return len(substring.encode('utf-16-le')) // 2 - 1def make_lsp_message(method, params, id_=None):"""构造LSP协议消息"""req = {}if id_ is not None:req['id'] = id_req['jsonrpc'] = "2.0"req['method'] = methodreq['params'] = paramsbody = json.dumps(req)content_length = len(body.encode('utf-8'))return f"Content-Length: {content_length}\r\n\r\n{body}"def read_messages(out_queue):pubsub = r.pubsub()pubsub.subscribe("STDOUT")for message in pubsub.listen():if message['type'] == 'message':msg = json.loads(message['data'])out_queue.put(msg)
# 全局记录已打开的文件
opened_files = set()
def add_file(file_path):global opened_filesfile_path = os.path.abspath(file_path)uri = f"file://{file_path}"    if uri in opened_files:return    try:with open(file_path, "r", encoding="utf-8") as f:file_content = f.read()except Exception as e:print(f"无法打开文件 {file_path}: {e}")returndid_open_params = {"textDocument": {"uri": uri,"languageId": "cpp","version": 1,"text": file_content}}notify_msg = make_lsp_message("textDocument/didOpen", did_open_params, None)r.publish("STDIN",notify_msg)opened_files.add(uri)time.sleep(0.5)  # 短暂等待确保文件加载out_queue = queue.Queue()
reader_thread = threading.Thread(target=read_messages, args=(out_queue,))
reader_thread.daemon = True
reader_thread.start()def send_request(method, params, id_):"""发送LSP请求到Redis"""msg = make_lsp_message(method, params, id_)r.publish("STDIN",msg)
# ============== 核心功能:递归生成调用关系图 ==============
def get_node_id(item):"""生成唯一的节点ID"""uri = item['uri']start = item['range']['start']return f"{uri}_{start['line']}_{start['character']}"def request_calls(method, item, req_id):"""发送LSP调用关系请求的通用方法    Args:method: 请求类型(incomingCalls/outgoingCalls)item: 调用层级条目req_id: 请求IDReturns:list: 调用关系结果集Raises:打印LSP协议错误信息"""uri = item['uri']if uri.startswith("file://"):file_path = uri[7:]add_file(file_path)params = {"item": item}send_request(method, params, req_id)while True:resp = out_queue.get()if "id" in resp and resp["id"] == req_id:return resp.get("result", [])# 处理可能的错误响应if "error" in resp and resp["id"] == req_id:print(f"请求 {method} 错误: {resp['error']}")return []name_cache={}
g_counter=10
def get_uuid(name):global name_cacheglobal g_counterif name in name_cache:return name_cache[name]else:g_counter+=1name_cache[name]=f'{g_counter}'return name_cache[name]def is_valid_url(url):if url.startswith("/apollo") and url.find("bazel")<0 and url.find('example')<0 and url.find('test')<0:return Truereturn Falsedef is_node_valid(name):if name.find("<")<0 and name.find("[")<0 and name.find('(')<0:return Truereturn Falsedef analyze_call_hierarchy(file_path,target_line,utf16_offset):"""核心分析函数       实现步骤:1. 准备调用层级请求参数2. 发送LSP协议请求获取调用关系3. 处理incoming/outgoing调用数据4. 生成Mermaid图表和Graphviz可视化Args:file_path: 目标文件路径target_line: 目标行号(0-based)utf16_offset: UTF-16编码的字符偏移量"""# 步骤1: 准备调用层次target_uri = "file://" + os.path.abspath(file_path)request_id = 200prepare_params = {"textDocument": {"uri": target_uri},"position": {"line": target_line, "character": utf16_offset}}send_request("textDocument/prepareCallHierarchy", prepare_params, request_id) # 等待响应    call_items = Nonewhile True:resp = out_queue.get()if "id" in resp and resp["id"] == request_id:result = resp.get("result")if len(result)>0:print("prepareCallHierarchy:",len(result))call_items=result[0]breakprint(call_items)core_name="apollo::cyber::common::GetProtoFromFile"fo=open("call_graph.md","w")fo.write("```mermaid\n")fo.write("graph LR\n")node_styles = {'target': {'fillcolor': 'lightblue', 'style': 'filled,rounded', 'shape': 'box'},'caller': {'fillcolor': 'lightgreen', 'style': 'filled,rounded', 'shape': 'box'},'callee': {'fillcolor': 'lightyellow', 'style': 'filled,rounded', 'shape': 'box'},'outgoing': {'fillcolor': 'lightgrey', 'style': 'filled,rounded', 'shape': 'box'}}# 创建Graphviz图表dot = graphviz.Digraph(comment='Function Call Tree', graph_attr={'rankdir': 'LR', 'nodesep': '0.5'})dot.node(get_uuid(core_name), core_name)# 步骤2: 分析被调用函数(outgoing)outgoing_calls = request_calls("callHierarchy/outgoingCalls", call_items, 2002)for call in outgoing_calls:call_item = call['to']detail=call_item['detail']line=call_item['range']['start']['line']character=call_item['range']['start']['character']url=call_item['uri'].replace('file://','')if is_valid_url(url) and is_node_valid(detail):print(f"{detail} {url}")dot.node(get_uuid(detail), detail)dot.edge(get_uuid(core_name), get_uuid(detail))fo.write(f"    {get_uuid(core_name)}[{core_name}] --> {get_uuid(detail)}[{detail}]\n")# 步骤3: 分析调用者函数(incoming)if call_items is not None:incoming_calls = request_calls("callHierarchy/incomingCalls", call_items, 2001)for call in incoming_calls:caller_item = call['from']detail=caller_item['detail']line=caller_item['range']['start']['line']character=caller_item['range']['start']['character']url=caller_item['uri'].replace('file://','')if is_valid_url(url) and is_node_valid(detail):print(f"{detail} {url}")fo.write(f"    {get_uuid(detail)}[{detail}] -->{get_uuid(core_name)}[{core_name}]\n")dot.node(get_uuid(detail), detail)dot.edge(get_uuid(detail), get_uuid(core_name))              outgoing_calls = request_calls("callHierarchy/outgoingCalls", caller_item, 2002)for call in outgoing_calls:call_item = call['to']_detail=call_item['detail']line=call_item['range']['start']['line']character=call_item['range']['start']['character']url=call_item['uri'].replace('file://','')if is_valid_url(url) and is_node_valid(_detail):print(f"{_detail} {url}")fo.write(f"    {get_uuid(detail)}[{detail}] -->{get_uuid(_detail)}[{_detail}]\n")dot.node(get_uuid(_detail), _detail)dot.edge(get_uuid(detail), get_uuid(_detail))    fo.write("```\n")fo.close()dot.render("call_graph", format='png', view=False)with open('list.txt','r') as f:for file_path in f.readlines():add_file(f'/apollo/{file_path.strip()}')# 定位目标函数(示例为GetProtoFromFile)
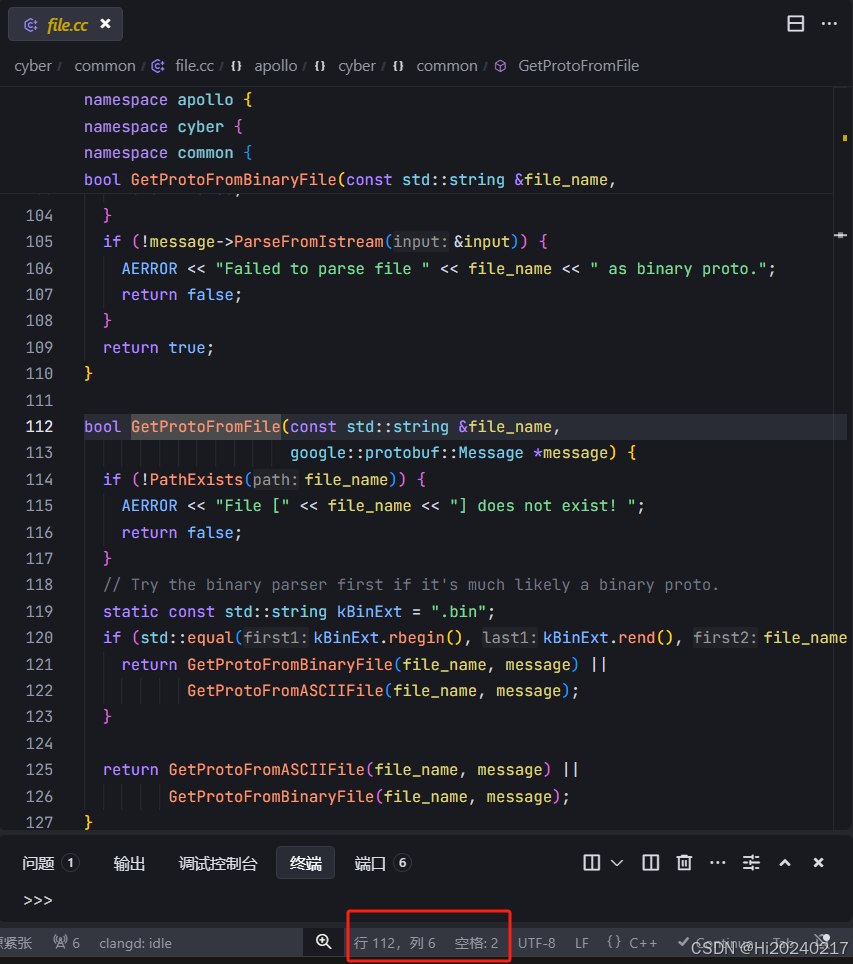
file_path = "/apollo/cyber/common/file.cc"
with open(file_path, "r", encoding="utf-8") as f:lines = f.readlines()target_line = 111
line_text = lines[target_line].rstrip('\n')
print(f"目标行内容: {line_text}")
unicode_char_index = 6# 计算UTF-16偏移量
utf16_offset = char_to_utf16_offset(line_text, unicode_char_index)
print("UTF-16编码偏移:", utf16_offset)
analyze_call_hierarchy(file_path,target_line,utf16_offset)
EOF
python3.10 lsp_client.py
注意
- 如果第一次
lsp_client.py获取的调用栈不完整,多试几次
如何获取行号、列号
五、可视化结果
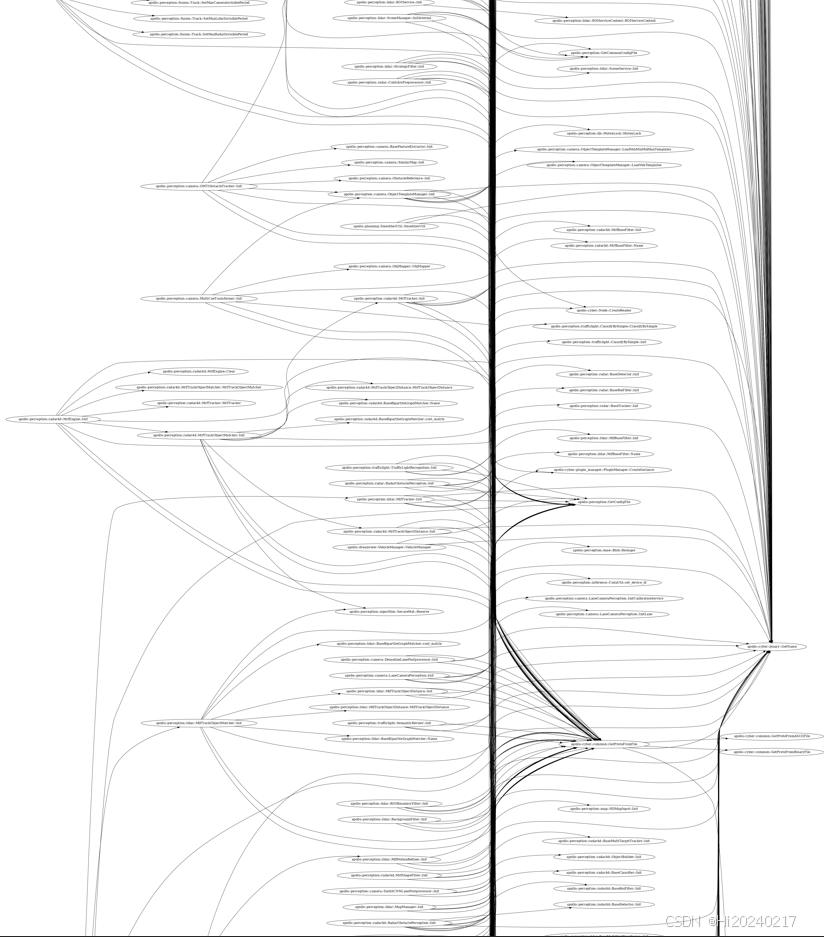
5.1 Graphviz输出call_graph.png
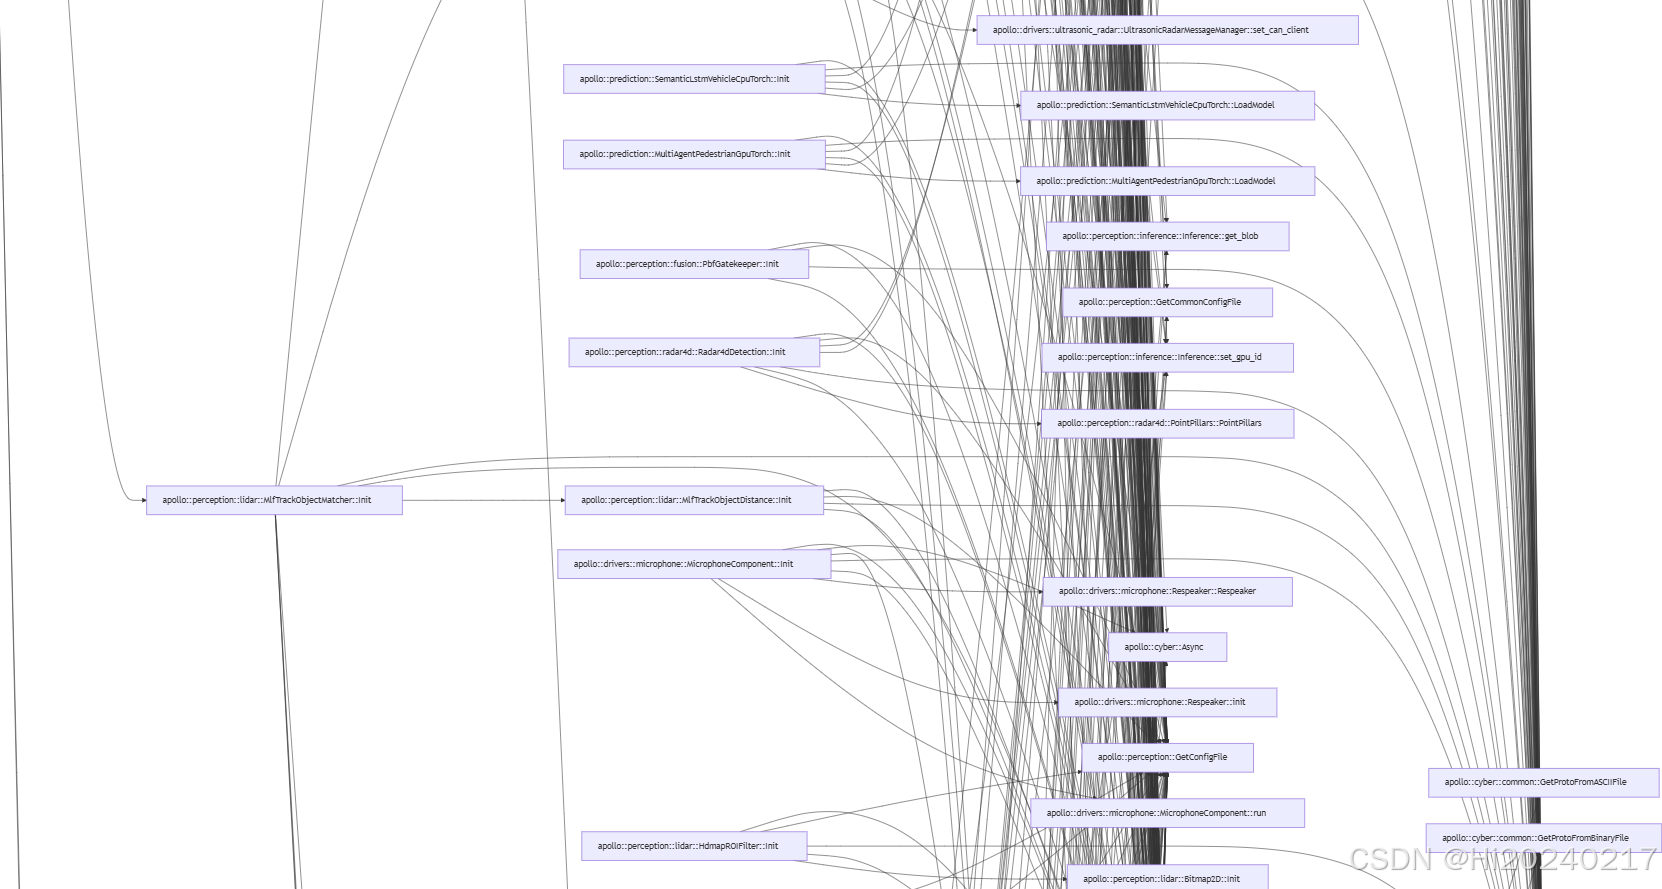
5.2 Mermaid图表转SVG
docker pull minlag/mermaid-cli
cat > config.json <<-'EOF'
{"maxTextSize": 1000000,"maxEdges": 1000000
}
EOF
docker stop candy
docker rm candy
docker run --privileged --name candy -v $(pwd):/data minlag/mermaid-cli -i /data/call_graph.md -c /data/config.json -o /tmp/output.svg -s 5
docker cp candy:/tmp/output-1.svg ./
Vscode打开output-1.svg
六、应用场景与优势
6.1 典型应用
- 代码理解:新成员快速掌握复杂代码结构
- 影响分析:评估函数修改的影响范围
- 性能优化:识别高频调用路径
- 架构重构:发现模块间依赖关系
6.2 技术优势
- 精准分析:基于Clang的AST解析,结果准确
- 跨平台:支持Linux/macOS/Windows(WSL)
- 可扩展:可集成到CI/CD流水线
- 高性能:Redis缓存加速重复查询
七、总结
本文介绍了一种基于clangd和LSP协议的Apollo工程函数调用关系分析方案,通过:
- LSP协议实现与语言服务器的标准化通信
- 多进程架构确保分析过程稳定高效
- 递归查询构建完整的调用关系树
- Graphviz/Mermaid实现专业可视化
该方法不仅适用于Apollo项目,也可扩展到其他大型C/C++工程。未来可进一步优化:
- 添加调用频率统计
- 支持增量分析
- 集成Web可视化界面