【数据库】MySQL8中的新增特性有哪些?

MySQL8中的新增特性有哪些?
- MySQL8中的新增特性有哪些?
- 1. 账户与安全
- (1) 用户创建和授权
- (2) 认证插件更新
- (3) 密码管理
- 2. 索引增强
- (1) 隐藏索引(隐式索引)
- (2) 降序索引
- (3) 函数索引
- 3. 通用表表达式(CTE)
- 4. 窗口函数
- 5. 原子DDL操作
- 6. JSON 增强
- 7. InnoDB其他改进功能
- (1) 自增列持久化
- (2) 死锁检查控制
- (3) 锁定语句选项
- (4) InnoDB 其他改进功能
MySQL8中的新增特性有哪些?
1. 账户与安全
用户的创建与授权需要两条单独的SQL语句执行。认证插件更新。密码管理和角色管理发生变化。
(1) 用户创建和授权
- MySQL8的版本
mysql> \s
--------------
mysql  Ver 8.3.0 for Linux on x86_64 (MySQL Community Server - GPL)Connection id:          9
Current database:
Current user:           root@localhost
SSL:                    Not in use
Current pager:          stdout
Using outfile:          ''
Using delimiter:        ;
Server version:         8.3.0 MySQL Community Server - GPL
Protocol version:       10
Connection:             Localhost via UNIX socket
Server characterset:    utf8mb4
Db     characterset:    utf8mb4
Client characterset:    latin1
Conn.  characterset:    latin1
UNIX socket:            /var/run/mysqld/mysqld.sock
Binary data as:         Hexadecimal
Uptime:                 2 min 4 secThreads: 2  Questions: 6  Slow queries: 0  Opens: 119  Flush tables: 3  Open tables: 38  Queries per second avg: 0.048
--------------
mysql> grant all privileges on *.* to 'test'@'%' identified by 'test@2024';
ERROR 1064 (42000): You have an error in your SQL syntax; check the manual that corresponds to your MySQL server version for the right syntax to use near 'identified by 'test@2024'' at line 1mysql> create user 'test'@'%' identified by 'test@2024';
Query OK, 0 rows affected (0.01 sec)mysql> grant all privileges on *.* to 'test'@'%';
Query OK, 0 rows affected (0.01 sec)mysql> select host,user from mysql.user;
+-----------+------------------+
| host      | user             |
+-----------+------------------+
| %         | root             |
| %         | test             |
| localhost | mysql.infoschema |
| localhost | mysql.session    |
| localhost | mysql.sys        |
| localhost | root             |
+-----------+------------------+
6 rows in set (0.00 sec)
- MySQL5.7的版本
mysql> \s
--------------
mysql  Ver 14.14 Distrib 5.7.43, for Linux (x86_64) using  EditLine wrapperConnection id:          577
Current database:
Current user:           root@localhost
SSL:                    Not in use
Current pager:          stdout
Using outfile:          ''
Using delimiter:        ;
Server version:         5.7.43 MySQL Community Server (GPL)
Protocol version:       10
Connection:             Localhost via UNIX socket
Server characterset:    utf8mb4
Db     characterset:    utf8mb4
Client characterset:    latin1
Conn.  characterset:    latin1
UNIX socket:            /var/run/mysqld/mysqld.sock
Uptime:                 183 days 29 min 45 secThreads: 2  Questions: 26451  Slow queries: 0  Opens: 310  Flush tables: 1  Open tables: 301  Queries per second avg: 0.001
--------------
mysql> grant all privileges on *.* to 'test'@'%' identified by 'test@2024';
Query OK, 0 rows affected, 1 warning (0.00 sec)
(2) 认证插件更新
MySQL8 中默认的身份认证插件是 caching_sha2_password,替代了之前的mysql_native_password。
- MySQL8
mysql> show variables like 'default_authentication%';
+-------------------------------+-----------------------+
| Variable_name                 | Value                 |
+-------------------------------+-----------------------+
| default_authentication_plugin | caching_sha2_password |
+-------------------------------+-----------------------+
1 row in set (0.00 sec)
- MySQL5.7
mysql> show variables like 'default_authentication%';
+-------------------------------+-----------------------+
| Variable_name                 | Value                 |
+-------------------------------+-----------------------+
| default_authentication_plugin | mysql_native_password |
+-------------------------------+-----------------------+
1 row in set (0.00 sec)
这个带来的问题就是如果客户端没有更新(仍然使用 5.x 的客户端链接 8.0+),就链接不上
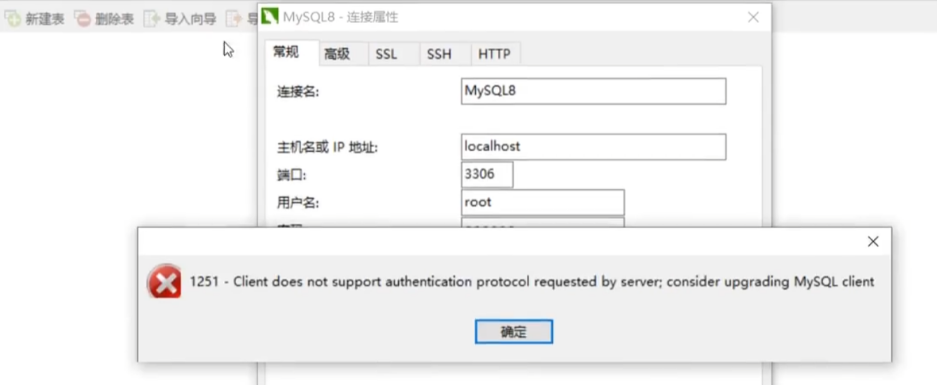
当然可以通过在MySQL的服务端找到my.cnf的文件,把参数进行修改(不过要MySQL重启后才能生效)

如果没办法重启服务,还有一种动态的方式:
mysql> alter user 'test'@'%' identified with mysql_native_password by 'test@2024';
Query OK, 0 rows affected (0.01 sec)
mysql> select host,user,plugin from mysql.user;
+-----------+------------------+-----------------------+
| host      | user             | plugin                |
+-----------+------------------+-----------------------+
| %         | root             | caching_sha2_password |
| %         | test             | mysql_native_password |
| localhost | mysql.infoschema | caching_sha2_password |
| localhost | mysql.session    | caching_sha2_password |
| localhost | mysql.sys        | caching_sha2_password |
| localhost | root             | caching_sha2_password |
+-----------+------------------+-----------------------+
6 rows in set (0.00 sec)
(3) 密码管理
MySQL 8.0开始允许限制重复使用以前的密码(修改密码时),并且还加入了密码的修改管理功能。
mysql> show variables like 'password%';
+--------------------------+-------+
| Variable_name            | Value |
+--------------------------+-------+
| password_history         | 0     |
| password_require_current | OFF   |
| password_reuse_interval  | 0     |
+--------------------------+-------+
3 rows in set (0.00 sec)
- 修改策略(全局级)
mysql> set persist password_history=3;	--修改密码不能和最近3次一致
Query OK, 0 rows affected (0.01 sec)mysql> show variables like 'password%';
+--------------------------+-------+
| Variable_name            | Value |
+--------------------------+-------+
| password_history         | 3     |
| password_require_current | OFF   |
| password_reuse_interval  | 0     |
+--------------------------+-------+
3 rows in set (0.00 sec)
- 修改策略(用户级)
mysql> alter user 'test'@'%' password history 3;
Query OK, 0 rows affected (0.01 sec)mysql> select user,host,password_reuse_history from mysql.user;
+------------------+-----------+------------------------+
| user             | host      | password_reuse_history |
+------------------+-----------+------------------------+
| root             | %         |                   NULL |
| test             | %         |                      3 |
| mysql.infoschema | localhost |                   NULL |
| mysql.session    | localhost |                   NULL |
| mysql.sys        | localhost |                   NULL |
| root             | localhost |                   NULL |
+------------------+-----------+------------------------+
6 rows in set (0.00 sec)
使用重复密码修改用户密码(指定test用户)
mysql> alter user 'test'@'%' identified by 'test@2024';
ERROR 3638 (HY000): Cannot use these credentials for 'test@%' because they contradict the password history policy
如果我们把全局的参数改为0,则对于root用户可以反复的修改密码
mysql> set persist password_history=0;
Query OK, 0 rows affected (0.01 sec)mysql> alter user 'root'@'localhost' identified by '456789';
Query OK, 0 rows affected (0.01 sec)mysql> alter user 'root'@'localhost' identified by '456789';
Query OK, 0 rows affected (0.01 sec)mysql> alter user 'root'@'localhost' identified by '456789';
Query OK, 0 rows affected (0.01 sec)mysql> alter user 'root'@'localhost' identified by '456789';
Query OK, 0 rows affected (0.01 sec)
- 相关参数
- password_reuse_interval 则是按照天数来限定(不允许重复的)
- password_require_current 是否需要校验旧密码(off不校验、on校验)(针对非root用户)
2. 索引增强
被隐藏的索引不会被优化器使用,但依然真实存在,主要用于软删除。按降序保存,不再对 group by 操作进行隐式排序。
(1) 隐藏索引(隐式索引)
MySQL 8.0开始支持隐藏索引(invisible index),不可见索引。
隐藏索引不会被优化器使用,但仍然需要进行维护。
应用场景:软删除、灰度发布。
软删除:就是我们在线上会经常删除和创建索引,如果是以前的版本,我们如果删除了索引,后面发现删错了,我又需要创建一个索引,这样做的话就非常影响性能。在MySQL8中我们可以这么操作,把一个索引变成隐藏索引(索引就不可用了,查询优化器也用不上),最后确定要进行删除这个索引我们才会进行删除索引操作。
灰度发布:也是类似的,我们想在线上进行一些测试,可以先创建一个隐藏索引,不会影响当前的生产环境,然后我们统过一些附加的测试,发现这个索引没问题,那么就直接把这个索引改成正式的索引,让线上环境生效。
使用案例(灰度发布):
mysql> create table t1(i int,j int);
Query OK, 0 rows affected (0.01 sec)mysql> create index idx_i on t1(i); --正常索引
Query OK, 0 rows affected (0.01 sec)
Records: 0  Duplicates: 0  Warnings: 0mysql> create index idx_j on t1(j) invisible; --隐藏索引
Query OK, 0 rows affected (0.01 sec)
Records: 0  Duplicates: 0  Warnings: 0mysql> show index from t1\G	--查看索引信息 visible
*************************** 1. row ***************************Table: t1Non_unique: 1Key_name: idx_iSeq_in_index: 1Column_name: iCollation: ACardinality: 0Sub_part: NULLPacked: NULLNull: YESIndex_type: BTREEComment:
Index_comment:Visible: YESExpression: NULL
*************************** 2. row ***************************Table: t1Non_unique: 1Key_name: idx_jSeq_in_index: 1Column_name: jCollation: ACardinality: 0Sub_part: NULLPacked: NULLNull: YESIndex_type: BTREEComment:
Index_comment:Visible: NOExpression: NULL
2 rows in set (0.02 sec)
使用查询优化器看下:
mysql> explain select * from t1 where i=1;
+----+-------------+-------+------------+------+---------------+-------+---------+-------+------+----------+-------+
| id | select_type | table | partitions | type | possible_keys | key   | key_len | ref   | rows | filtered | Extra |
+----+-------------+-------+------------+------+---------------+-------+---------+-------+------+----------+-------+
|  1 | SIMPLE      | t1    | NULL       | ref  | idx_i         | idx_i | 5       | const |    1 |   100.00 | NULL  |
+----+-------------+-------+------------+------+---------------+-------+---------+-------+------+----------+-------+
1 row in set, 1 warning (0.01 sec)mysql> explain select * from t1 where j=1;
+----+-------------+-------+------------+------+---------------+------+---------+------+------+----------+-------------+
| id | select_type | table | partitions | type | possible_keys | key  | key_len | ref  | rows | filtered | Extra       |
+----+-------------+-------+------------+------+---------------+------+---------+------+------+----------+-------------+
|  1 | SIMPLE      | t1    | NULL       | ALL  | NULL          | NULL | NULL    | NULL |    1 |   100.00 | Using where |
+----+-------------+-------+------------+------+---------------+------+---------+------+------+----------+-------------+
1 row in set, 1 warning (0.00 sec)
看 type 隐藏索引不会用上,走了 “ALL” 全表扫描。
这里可以通过优化器的开关,打开一个设置,方便我们对隐藏索引进行设置。
mysql> select @@optimizer_switch\G	--查看各种参数
*************************** 1. row ***************************
@@optimizer_switch: index_merge=on,index_merge_union=on,index_merge_sort_union=on,index_merge_intersection=on,engine_condition_pushdown=on,index_condition_pushdown=on,mrr=on,mrr_cost_based=on,block_nested_loop=on,batched_key_access=off,materialization=on,semijoin=on,loosescan=on,firstmatch=on,duplicateweedout=on,subquery_materialization_cost_based=on,use_index_extensions=on,condition_fanout_filter=on,derived_merge=on,use_invisible_indexes=off,skip_scan=on,hash_join=on,subquery_to_derived=off,prefer_ordering_index=on,hypergraph_optimizer=off,derived_condition_pushdown=on,hash_set_operations=on
1 row in set (0.00 sec)
可以看到 use_invisible_indexes=off,就是默认查询优化器对隐藏索引不可见,我们可以通过参数进行修改。确保我们可以用隐藏索引进行测试。
mysql> set session optimizer_switch="use_invisible_indexes=on"; --在会话级别设置查询优化器可以看到隐藏索引
Query OK, 0 rows affected (0.00 sec)mysql> select @@optimizer_switch\G
*************************** 1. row ***************************
@@optimizer_switch: index_merge=on,index_merge_union=on,index_merge_sort_union=on,index_merge_intersection=on,engine_condition_pushdown=on,index_condition_pushdown=on,mrr=on,mrr_cost_based=on,block_nested_loop=on,batched_key_access=off,materialization=on,semijoin=on,loosescan=on,firstmatch=on,duplicateweedout=on,subquery_materialization_cost_based=on,use_index_extensions=on,condition_fanout_filter=on,derived_merge=on,use_invisible_indexes=on,skip_scan=on,hash_join=on,subquery_to_derived=off,prefer_ordering_index=on,hypergraph_optimizer=off,derived_condition_pushdown=on,hash_set_operations=on
1 row in set (0.00 sec)
再使用查询优化器查看:
mysql> explain select * from t1 where j=1;
+----+-------------+-------+------------+------+---------------+-------+---------+-------+------+----------+-------+
| id | select_type | table | partitions | type | possible_keys | key   | key_len | ref   | rows | filtered | Extra |
+----+-------------+-------+------------+------+---------------+-------+---------+-------+------+----------+-------+
|  1 | SIMPLE      | t1    | NULL       | ref  | idx_j         | idx_j | 5       | const |    1 |   100.00 | NULL  |
+----+-------------+-------+------------+------+---------------+-------+---------+-------+------+----------+-------+
1 row in set, 1 warning (0.00 sec)
把隐藏索引变成可见索引(正常索引)
alter table t1 alter index j_idx visible; --变成可见
alter table t1 alter index j_idx invisible; --变成不可见
最后一点,不能把主键设置成不可见的索引(隐藏索引)(MySQL做了限制)
(2) 降序索引
MySQL 8.0开始真正支持降序索引(descending index)。只有InnoDB存储引擎支持降序索引,只支持BTREE降序索引。另外 MySQL 8.0不再对 GROUP BY 操作进行隐式排序。
在MySQL中新建一个t2表
mysql> create table t2(c1 int,c2 int,index idx1(c1 asc,c2 desc));
Query OK, 0 rows affected (0.27 sec)mysql> show create table t2\G
*************************** 1. row ***************************Table: t2
Create Table: CREATE TABLE `t2` (`c1` int DEFAULT NULL,`c2` int DEFAULT NULL,KEY `idx1` (`c1`,`c2` DESC)
) ENGINE=InnoDB DEFAULT CHARSET=utf8mb4 COLLATE=utf8mb4_general_ci
1 row in set (0.00 sec)
如果是5.7中,则没有显示升序还是降序信息
mysql> create table t2(c1 int,c2 int,index idx1(c1 asc,c2 desc));
Query OK, 0 rows affected (0.00 sec)mysql> show create table t2\G
*************************** 1. row ***************************Table: t2
Create Table: CREATE TABLE `t2` (`c1` int(11) DEFAULT NULL,`c2` int(11) DEFAULT NULL,KEY `idx1` (`c1`,`c2`)
) ENGINE=InnoDB DEFAULT CHARSET=utf8mb4
1 row in set (0.00 sec)
下面插入一些数据,演示降序索引的使用
mysql> insert into t2(c1,c2) values(1,100),(2,200),(3,150),(4,50);
Query OK, 4 rows affected (1.37 sec)
Records: 4  Duplicates: 0  Warnings: 0mysql> select * from t2;
+------+------+
| c1   | c2   |
+------+------+
|    1 |  100 |
|    2 |  200 |
|    3 |  150 |
|    4 |   50 |
+------+------+
4 rows in set (0.00 sec)
查看索引使用情况
mysql> explain select * from t2 order by c1,c2 desc;
+----+-------------+-------+------------+-------+---------------+------+---------+------+------+----------+-------------+
| id | select_type | table | partitions | type  | possible_keys | key  | key_len | ref  | rows | filtered | Extra       |
+----+-------------+-------+------------+-------+---------------+------+---------+------+------+----------+-------------+
|  1 | SIMPLE      | t2    | NULL       | index | NULL          | idx1 | 10      | NULL |    4 |   100.00 | Using index |
+----+-------------+-------+------------+-------+---------------+------+---------+------+------+----------+-------------+
1 row in set, 1 warning (0.00 sec)
在5.7对比一下
mysql> explain select * from t2 order by c1,c2 desc;
+----+-------------+-------+------------+-------+---------------+------+---------+------+------+----------+-----------------------------+
| id | select_type | table | partitions | type  | possible_keys | key  | key_len | ref  | rows | filtered | Extra                       |
+----+-------------+-------+------------+-------+---------------+------+---------+------+------+----------+-----------------------------+
|  1 | SIMPLE      | t2    | NULL       | index | NULL          | idx1 | 10      | NULL |    4 |   100.00 | Using index; Using filesort |
+----+-------------+-------+------------+-------+---------------+------+---------+------+------+----------+-----------------------------+
1 row in set, 1 warning (0.00 sec)
这里说明,这里需要一个额外的排序操作,才能把刚才的索引利用上
因此把查询语句换下
mysql> explain select * from t2 order by c1 desc,c2;
+----+-------------+-------+------------+-------+---------------+------+---------+------+------+----------+----------------------------------+
| id | select_type | table | partitions | type  | possible_keys | key  | key_len | ref  | rows | filtered | Extra                            |
+----+-------------+-------+------------+-------+---------------+------+---------+------+------+----------+----------------------------------+
|  1 | SIMPLE      | t2    | NULL       | index | NULL          | idx1 | 10      | NULL |    4 |   100.00 | Backward index scan; Using index |
+----+-------------+-------+------------+-------+---------------+------+---------+------+------+----------+----------------------------------+
1 row in set, 1 warning (0.00 sec)
8.0中使用了“Backward index scan”
另外还有一点,就是group by语句在 8.0 之后不再默认排序,需要排序的话需加上order by
- mysql8
mysql> select count(*),c2 from t2 group by c2;
+----------+------+
| count(*) | c2   |
+----------+------+
|        1 |  100 |
|        1 |  200 |
|        1 |  150 |
|        1 |   50 |
+----------+------+
4 rows in set (0.00 sec)
- mysql5.7
mysql> select count(*),c2 from t2 group by c2;
+----------+------+
| count(*) | c2   |
+----------+------+
|        1 |   50 |
|        1 |  100 |
|        1 |  150 |
|        1 |  200 |
+----------+------+
4 rows in set (0.00 sec)
(3) 函数索引
之前我们知道,如果在查询中加入了函数,索引不生效,所以MySQL8引入了函数索引。
MySQL 8.0.13开始支持在索引中使用函数(表达式)的值。支持降序索引,支持JSON数据的索引
函数索引基于虚拟列功能实现。
使用函数索引(表达式)
mysql> create table t3(c1 varchar(10),c2 varchar(10));
Query OK, 0 rows affected (0.37 sec)mysql> create index idx_c1 on t3(c1); --普通索引
Query OK, 0 rows affected (0.58 sec)
Records: 0  Duplicates: 0  Warnings: 0mysql> create index func_idx on t3( (UPPER(c2)) ); --一个大写的函数索引
Query OK, 0 rows affected (1.24 sec)
Records: 0  Duplicates: 0  Warnings: 0mysql> show index from t3\G
*************************** 1. row ***************************Table: t3Non_unique: 1Key_name: idx_c1Seq_in_index: 1Column_name: c1Collation: ACardinality: 0Sub_part: NULLPacked: NULLNull: YESIndex_type: BTREEComment:
Index_comment:Visible: YESExpression: NULL
*************************** 2. row ***************************Table: t3Non_unique: 1Key_name: func_idxSeq_in_index: 1Column_name: NULLCollation: ACardinality: 0Sub_part: NULLPacked: NULLNull: YESIndex_type: BTREEComment:
Index_comment:Visible: YESExpression: upper(`c2`)
2 rows in set (0.11 sec)mysql> explain select * from t3 where upper(c1)='ABC';
+----+-------------+-------+------------+------+---------------+------+---------+------+------+----------+-------------+
| id | select_type | table | partitions | type | possible_keys | key  | key_len | ref  | rows | filtered | Extra       |
+----+-------------+-------+------------+------+---------------+------+---------+------+------+----------+-------------+
|  1 | SIMPLE      | t3    | NULL       | ALL  | NULL          | NULL | NULL    | NULL |    1 |   100.00 | Using where |
+----+-------------+-------+------------+------+---------------+------+---------+------+------+----------+-------------+
1 row in set, 1 warning (0.00 sec)mysql> explain select * from t3 where upper(c2)='ABC';
+----+-------------+-------+------------+------+---------------+----------+---------+-------+------+----------+-------+
| id | select_type | table | partitions | type | possible_keys | key      | key_len | ref   | rows | filtered | Extra |
+----+-------------+-------+------------+------+---------------+----------+---------+-------+------+----------+-------+
|  1 | SIMPLE      | t3    | NULL       | ref  | func_idx      | func_idx | 43      | const |    1 |   100.00 | NULL  |
+----+-------------+-------+------------+------+---------------+----------+---------+-------+------+----------+-------+
1 row in set, 1 warning (0.00 sec)
使用函数索引(JSON)
mysql> create table t4(data json,index(( CAST(data->>'$.name' as char(25)) )));
Query OK, 0 rows affected (0.42 sec)mysql> explain select * from t4 where CAST(data->>'$.name' as char(25)) ='test';
+----+-------------+-------+------------+------+------------------+------------------+---------+-------+------+----------+-------+
| id | select_type | table | partitions | type | possible_keys    | key              | key_len | ref   | rows | filtered | Extra |
+----+-------------+-------+------------+------+------------------+------------------+---------+-------+------+----------+-------+
|  1 | SIMPLE      | t4    | NULL       | ref  | functional_index | functional_index | 28      | const |    1 |   100.00 | NULL  |
+----+-------------+-------+------------+------+------------------+------------------+---------+-------+------+----------+-------+
1 row in set, 1 warning (0.00 sec)
函数索引基于虚拟列功能实现
函数索引在MySQL中相当于新增了一个列,这个列会根据你的函数来进行计算结果,然后使用函数索引的时候就会用这个计算后的列作为索引。
3. 通用表表达式(CTE)
MySQL8.0开始支持通用表表达式(CTE)(common table expression),即WITH子句。
简单入门:
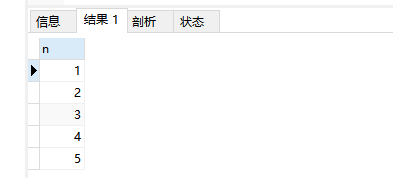
以下SQL就是一个简单的CTE表达式,类似于递归调用,这段SQL中,首先执行select 1 然后得到查询的结果后把这个值n送入 union all 下面的 select n+1 from cte where n <5,然后一致这样递归调用union all下面sql语句。
WITH recursive cte(n) as
( 	select 1union allselect n+1 from cte where n<5
)
select * from cte;
案例介绍:
一个staff表,里面有id,有name还有一个m_id,这个是对应上级id。
create table staff(id int,name varchar(30),m_id int);
insert into staff(id,name,m_id) values(1,'老板',0),(2,'总监',1),(3,'秘书',1),(4,'张三',2),(5,'李四',2),(6,'小刘',4),(7,'小倪',5);
如果我们想查出每一个员工的上下级关系,可以用以下方式
递归CTE:
with recursive staff_view(id,name,m_id) as
(	select id,name,cast(id as char(200))from staff where m_id =0union allselect s2.id, s2.name, concat(s1.m_id,'-',s2.id)from staff_view as s1 join staff as s2on s1.id = s2.m_id
)
select * from staff_view order by id;
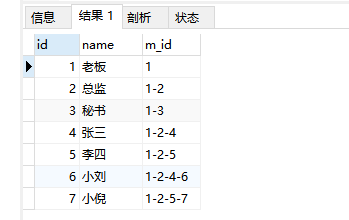
使用通用表表达式的好处就是上下层级就算有4,5,6甚至更多层,都可以帮助我们遍历出来,而老的方式的写法SQL语句就要调整。
总结:
通用表表达式与派生表类似,就像语句级别的临时表或视图。CTE可以在查询中多次引用,可以引用其他CTE,可以递归。CTE支持SELECT/INSERT/UPDATE/DELETE等语句。
4. 窗口函数
MySQL8支持窗口函数(Window Function),也称分析函数。窗口函数与分组聚合函数类似,但是每一行数据都生成一个结果。聚合窗口函数:SUM / AVG / COUNT / MAX / MIN 等等。
案例如下:
sales表结构及数据
create table sales(year int,country varchar(30),product varchar(50),sum int);
insert into sales(year,country,product,sum)
values(2022,'USA','phote',1800),(2023,'USA','phote',2400),(2024,'USA','phote',2900),(2022,'CHA','phote',5300),(2023,'CHA','phote',7800),(2024,'CHA','phote',3400),(2022,'JPA','phote',3300),(2023,'JPA','phote',5800),(2024,'JPA','phote',6400),(2022,'USA','TV',3300),(2023,'USA','TV',800),(2024,'USA','TV',400),(2022,'CHA','TV',300),(2023,'CHA','TV',800),(2024,'CHA','TV',400),(2022,'JPA','TV',300),(2023,'JPA','TV',800),(2024,'JPA','TV',500);
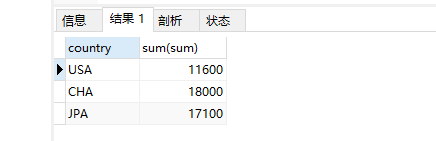
普通的分组、聚合(以国家汇总)
select country,sum(sum)
from sales
group by country;
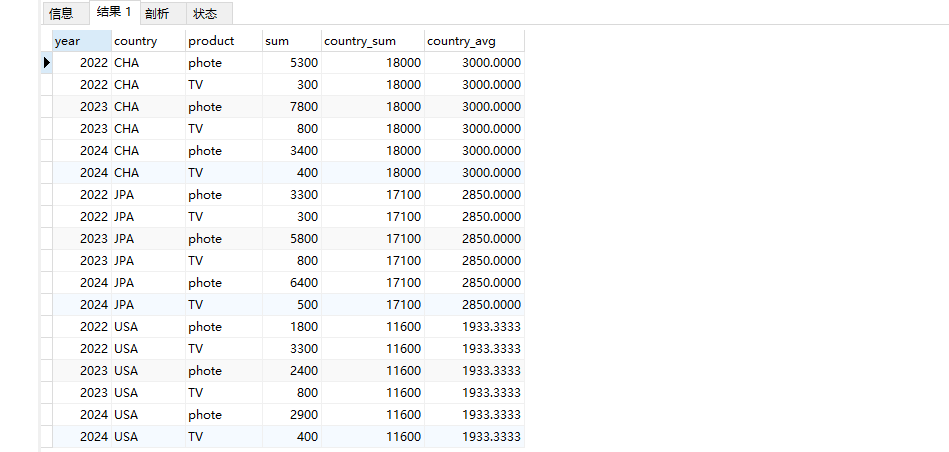
窗口函数(按国家汇总及计算平均值)
select year,country,product,sum,sum(sum) over(partition by country) as country_sum,avg(sum) over(partition by country) as country_avg
from sales
order by country,year,product,sum;
专用窗口函数:
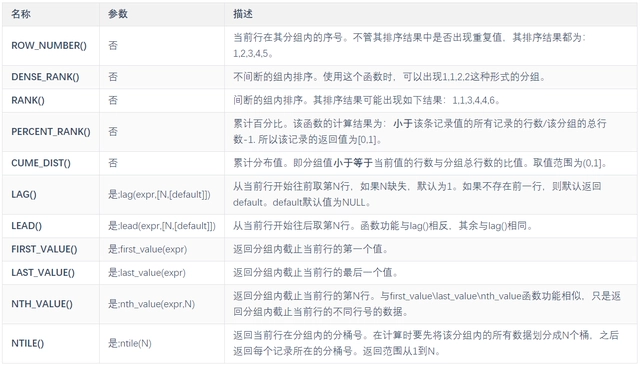
- 序号函数:ROW_NUMBER()、RANK()、DENSE_RANK()
- 分布函数:PERCENT_RANK()、CUME_DIST()
- 前后函数:LAG()、LEAD()
- 头尾函数:FIRST_VALUE()、LAST_VALUE()
- 其他函数:NTH_VALUE()、NTILE()
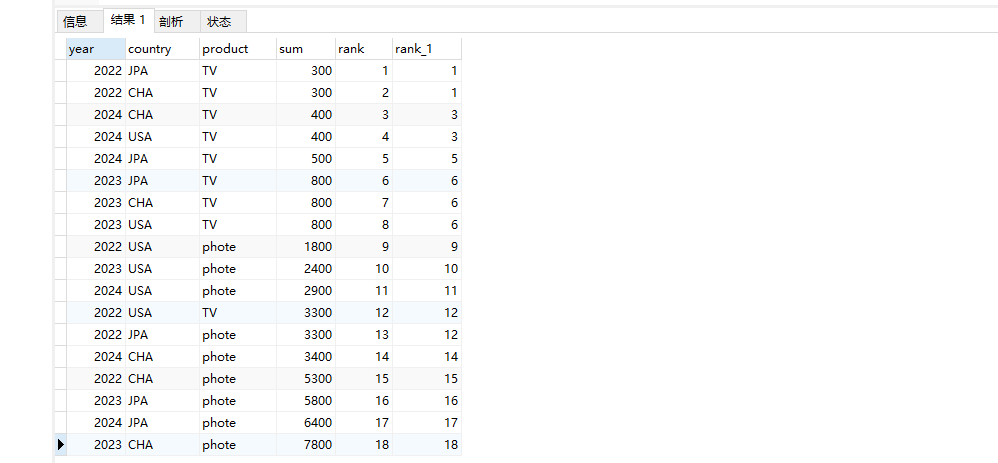
窗口函数(排名)
用于计算分类排名的排名窗口函数,以及获取指定位置数据的取值窗口函数
select year,country,product,sum,row_number() over(order by sum) as 'rank',rank() over(order by sum) as 'rank_1'
from sales;
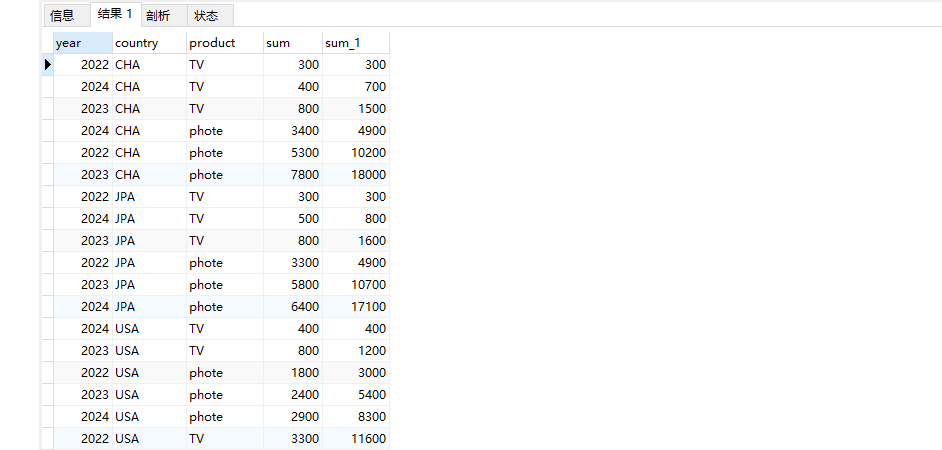
窗口函数(累计总和)
select year,country,product,sum,sum(sum) over (partition by country order by sum rows unbounded preceding) as 'sum_1'
from sales;
当然可以做的操作很多,具体见官网:
https://dev.mysql.com/doc/refman/8.0/en/window-function-descriptions.html
5. 原子DDL操作
执行drop命令 drop tablet1,t2; 如果t1存在,t2不存在。之前会删t1,增强后不会。
MySQL 8.0 开始支持原子DDL操作,其中与表相关的原子DDL只支持InnoDB存储引擎。一个原子DDL操作内容包括:更新数据字典,存储引擎层的操作,在binlog中记录DDL操作。支持与表相关的DDL:数据库、表空间、表、索引的CREATE、ALTER、DROP以及TRUNCATE TABLE。支持的其他DDL:存储过程、触发器、视图、UDF的CREATE、DROP以及ALTER语句。支持账户管理相关的DDL:用户和角色的CREATE、ALTER、DROP以及适用的RENAME,以及GRANT和REVOKE语句。
drop table t1,t2;
上面这个语句,如果只有t1表,没有t2表。在MySQL5.7与8的表现是不同的。
5.7会删除t1表。而在8中因为报错了,整个是一个原子操作,所以不会删除t1表。
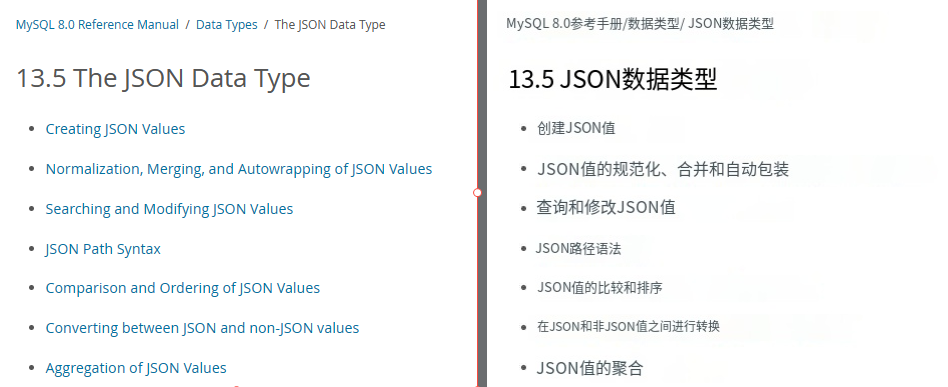
6. JSON 增强
具体看官网信息
https://dev.mysql.com/doc/refman/8.0/en/json.html
7. InnoDB其他改进功能
(1) 自增列持久化
MySQL 5.7以及早期版本,InnoDB自增列计数器(AUTO_INCREMENT)的值只存储在内存中。MySQL 8.0 每次变化时将自增计数器的最大值写入 redo log,同时在每次检查中将其写入引擎私有的系统表。解决了长期以来的自增字段值可能重复的bug。
(2) 死锁检查控制
MySQL 8.0 (MySQL 5.7.15)增加了一个新的动态变量,用于控制系统是否执行InnoDB死锁检查。对于高并发的系统,禁用死锁检查可能带来性能的提高。
innodb_deadlock_detect
(3) 锁定语句选项
SELECT … FOR SHARE 和SELECT … FOR UPDATE 中支持 NOWWAIT、SKIP LOCKED 选项。对于 NOWAIT,如果请求的行被其他事务锁定时,语句立即返回。对于SKIP LOCKED,从返回的结果集中移除被锁定的行。
(4) InnoDB 其他改进功能
- 支持部分快速DDL,ALTER TABLE ALGORITHM = INSTANT;
- InnoDB 临时表使用共享的临时表空间 ibtmp1。
- 新增静态变量 innodb_dedicated_server,自动配置 InnoDB 内存参数:Innodb_buffer_pool_size/innodb_log_size 等。
- 默认创建 2 个 UNDO 表空间,不再使用系统表空间。
- 支持 ALTER TABLESPACE … RENAME TO 重命名通用表空间。