Springboot 整合 Elasticsearch(三):使用RestHighLevelClient操作ES ①
:使用RestHighLevelClient操作ES ①)

📁 前情提要:
Springboot 整合 Elasticsearch(一):Linux下安装 Elasticsearch 8.x
Springboot 整合 Elasticsearch(二):使用HTTP请求来操作ES
目录
一、Springboot 整合 Elasticsearch
1、pom.xml 中添加依赖
2、application.yml 中添加配置项
3、RestHighLevelClient API介绍
3.1、连接配置类
3.2、检查索引是否存在
3.2、创建索引
3.3、删除索引
3.4、增加文档
3.5、按主键更新文档内容
3.6、按主键删除文档内容
3.7、批量添加文档
一、Springboot 整合 Elasticsearch
1、pom.xml 中添加依赖
<dependency><groupId>org.elasticsearch.client</groupId><artifactId>elasticsearch-rest-high-level-client</artifactId></dependency>2、application.yml 中添加配置项
spring:elasticsearch:rest:uris: 192.168.1.250:92003、RestHighLevelClient API介绍
3.1、连接配置类
@Component
public class EsConfig {@Value("${spring.elasticsearch.rest.uris}")private String uris;/*** 高版本客户端** @return*/@Beanpublic RestHighLevelClient restHighLevelClient() {String[] split = uris.split(",");HttpHost[] httpHostArray = new HttpHost[split.length];for (int i = 0; i < split.length; i++) {String item = split[i];httpHostArray[i] = new HttpHost(item.split(":")[0], Integer.parseInt(item.split(":")[1]), "http");}// 创建RestHighLevelClient客户端return new RestHighLevelClient(RestClient.builder(httpHostArray));}
}
3.2、检查索引是否存在
@Testpublic void checkIndex() {try {String indexName = "forest";boolean exists = esConfig.restHighLevelClient().indices().exists(new GetIndexRequest(indexName), RequestOptions.DEFAULT);System.out.println("exists:" + exists);} catch (IOException e) {e.printStackTrace();}}3.2、创建索引
@Testpublic void createIndex() {try {// 创建名为“森林”的索引String indexName = "forest";if (checkIndex(indexName)) {log.info("已存在名为{}的索引", indexName);return;}CreateIndexRequest createIndexRequest = new CreateIndexRequest(indexName);CreateIndexResponse createIndexResponse = esConfig.restHighLevelClient().indices().create(createIndexRequest, RequestOptions.DEFAULT);System.out.println("已创建索引:" + createIndexResponse.index());} catch (IOException e) {e.printStackTrace();}}public boolean checkIndex(String indexName) {boolean exists = false;try {exists = esConfig.restHighLevelClient().indices().exists(new GetIndexRequest(indexName), RequestOptions.DEFAULT);} catch (IOException e) {e.printStackTrace();}return exists;}
3.3、删除索引
@Testpublic void deleteIndex() {String indexName = "forest";DeleteIndexRequest deleteIndexRequest = new DeleteIndexRequest(indexName);// 发送delete请求try {AcknowledgedResponse response = esConfig.restHighLevelClient().indices().delete(deleteIndexRequest, RequestOptions.DEFAULT);System.out.println("是否已删除:" + response.isAcknowledged());} catch (IOException e) {e.printStackTrace();}}
3.4、增加文档
@Testpublic void createDoc() {try {String indexName = "forest";ForestDoc forestDoc = new ForestDoc();forestDoc.setId(001L).setTitle("枫树").setImages("http://fengshu.jpg").setPrice(300.00).setInventory(600);// 创建索引请求对象IndexRequest indexRequest = new IndexRequest(indexName);indexRequest.id(forestDoc.getId().toString());indexRequest.source(JSON.toJSONString(forestDoc), XContentType.JSON);// 设置数据刷新策略indexRequest.setRefreshPolicy(WriteRequest.RefreshPolicy.IMMEDIATE);IndexResponse index = esConfig.restHighLevelClient().index(indexRequest, RequestOptions.DEFAULT);System.out.println("状态:" + index.status().getStatus());} catch (IOException e) {e.printStackTrace();}}
⚠️RefreshPolicy 刷新策略,是WriteRequest接口中的一个内部枚举
① IMMEDIATE:
请求向ElasticSearch提交了数据,立即进行数据刷新,然后再结束请求。
优点:实时性高、操作延时短。
缺点:资源消耗高。
② WAIT_UNTIL:
请求向ElasticSearch提交了数据,等待数据完成刷新,然后再结束请求。
优点:实时性高、操作延时长。
缺点:资源消耗低。
③ NONE:
默认策略。
请求向ElasticSearch提交了数据,不关系数据是否已经完成刷新,直接结束请求。
优点:操作延时短、资源
3.5、按主键更新文档内容
修改 id 为 2 的 images字段内容
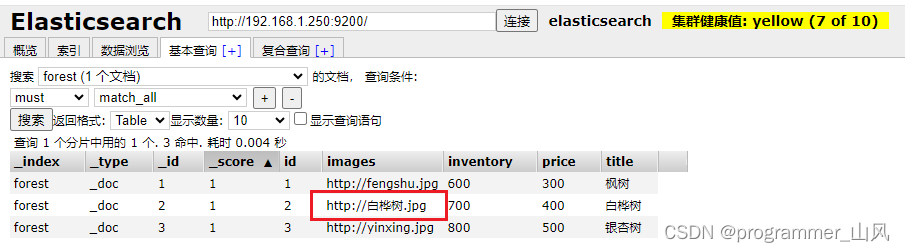
@Testpublic void updateDocById() {try {String indexName = "forest";String id = "2";UpdateRequest updateRequest = new UpdateRequest(indexName, id);Map<String, Object> map = new HashMap<>();map.put("images", "http://baihuashu.jpg");updateRequest.doc(map);UpdateResponse update = esConfig.restHighLevelClient().update(updateRequest, RequestOptions.DEFAULT);System.out.println("状态:" + update.status().getStatus());} catch (IOException e) {e.printStackTrace();}}
3.6、按主键删除文档内容

@Testpublic void deleteDocById() {String indexName = "forest";String id = "5";DeleteRequest deleteRequest = new DeleteRequest(indexName,id);try {DeleteResponse delete = esConfig.restHighLevelClient().delete(deleteRequest, RequestOptions.DEFAULT);System.out.println("状态:" + delete.status().getStatus());} catch (IOException e) {e.printStackTrace();}}
3.7、批量添加文档
@Testpublic void batchCreateDoc() {try {String indexName = "forest";List<ForestDoc> list = new ArrayList<>();ForestDoc forestDoc = new ForestDoc();forestDoc.setId(6L).setTitle("批量_柏树").setImages("http://baishu.jpg").setPrice(1100.00).setInventory(1200);list.add(forestDoc);ForestDoc forestDoc2 = new ForestDoc();forestDoc2.setId(7L).setTitle("批量_苹果树").setImages("http://pingguoshu.jpg").setPrice(1200.00).setInventory(1300);list.add(forestDoc2);ForestDoc forestDoc3 = new ForestDoc();forestDoc3.setId(8L).setTitle("批量_海棠树").setImages("http://haitangshu.jpg").setPrice(1300.00).setInventory(1400);list.add(forestDoc3);//批量导入BulkRequest bulk = new BulkRequest(indexName);for (ForestDoc doc : list) {IndexRequest indexRequest = new IndexRequest();indexRequest.id(doc.getId().toString());indexRequest.source(JSON.toJSONString(doc), XContentType.JSON);bulk.add(indexRequest);}BulkResponse bulkResponse = esConfig.restHighLevelClient().bulk(bulk, RequestOptions.DEFAULT);System.out.println("状态:" + bulkResponse.status().getStatus());} catch (IOException e) {e.printStackTrace();}}