【Linux系统化学习】自定义简易shell

目录
环境变量在进程替换中的继承
在当前进程中添加环境变量
putenv函数
环境变量被继承的原因
使用ecexle传递环境变量
传递自己的环境变量表
自定义简易的shell
获取主机、使用者、工作目录
获取命令
切割分解命令
创建子进程执行命令
内建命令的特殊处理
完整代码
 guan
guan
环境变量在进程替换中的继承
上片文章我们提到可以使用exec系列函数进行进程的替换。但是上篇文章中还有一个包含环境变量参数的exec系列的函数没有介绍;首先我们先验证下进程替换后环境变量也会继承父进程。
我们使用一个C++程序打印环境变量;在另一个程序中的子进程中使用execl替换该程序。
 1 #include <iostream>2 #include <unistd.h>
W>  3 int main(int argc, char *argv[], char *env[])4 {5     for(int i = 0; environ[i]; i++)                                                   6     {7         std::cout << i << " : " << env[i] << std::endl;8     }9     return 0;10 }
1 #include <stdio.h>2 #include <unistd.h>3 #include <stdlib.h>4 #include <sys/types.h>5 #include <sys/wait.h>6 7 extern char **environ;8 9 int main()10 {20 pid_t id = fork();21 if(id == 0)22 {23 printf("pid: %d, exec command begin\n", getpid());24 execl("./mytest", "mytest",NULL); 25 exit(1);26 }27 else{28 // father29 pid_t rid = waitpid(-1, NULL, 0);30 if(rid > 0)31 {32 printf("wait success, rid: %d\n", rid);33 }34 }35 return 0;36 }

现象:我们会发现替换的程序会打印出当前的环境变量。可能是继承父进程的。
在当前进程中添加环境变量
putenv函数
我们在当前的父进程中使用putenv函数添加环境变量,然后再子进程使用execl函数进行程序替换,替换的函数执行打印当前环境变量代码;观察现象;
    1 #include <stdio.h>2 #include <unistd.h>3 #include <stdlib.h>4 #include <sys/types.h>5 #include <sys/wait.h>6 7 extern char **environ;8 9 int main()10 {
W> 18     char *env_val = "MYVAL5=5555555555555555555555555";19     putenv(env_val);20     pid_t id = fork();21     if(id == 0)22     {                                                                                 23         printf("pid: %d, exec command begin\n", getpid());24         execl("./mytest", "mytest",NULL);25         exit(1);26     }27     else{28         // father29         pid_t rid = waitpid(-1, NULL, 0);30         if(rid > 0)31         {32             printf("wait success, rid: %d\n", rid);33         }34     }35     return 0;36 }

从这里我们可以看到,果然父进程的环境变量被继承了。
环境变量被继承的原因
这个问题也很简单,再之前学习进程的地址空间的时候。命令行参数和环境变量处在最高层;而程序替换只会替换下面的代码和数据;环境变量不会被替换。
因此,子进程是通过进程地址空间继承父进程的环境变量的;并且环境变量具有全局属性。

使用ecexle传递环境变量
上面的文章是替换程序直接使用父进程的环境变量;我们也可以使用execle函数给替换程序传递环境变量。
    1 #include <stdio.h>2 #include <unistd.h>3 #include <stdlib.h>4 #include <sys/types.h>5 #include <sys/wait.h>6 7 extern char **environ;8 9 int main()10 {
W> 18     char *env_val = "MYVAL5=5555555555555555555555555";19     putenv(env_val);20     pid_t id = fork();21     if(id == 0)22     {23         printf("pid: %d, exec command begin\n", getpid());24         execle("./mytest", "mytest","-a" , "-b", NULL ,environ);25         exit(1);                                                                  26     }                                                                             27     else{                                      28         // father                              29         pid_t rid = waitpid(-1, NULL, 0);      30         if(rid > 0)                            31         {                                      32             printf("wait success, rid: %d\n", rid);33         }                                      34     }                                          35     return 0;                                  36 }
1 #include <iostream>2 #include <unistd.h>
W> 3 int main(int argc, char *argv[], char *env[])4 {5 for(int i=0;i<argc;i++)6 {7 std:: cout<<i << " :"<<argv[i]<<std::endl; 8 } 9 for(int i = 0; environ[i]; i++)10 { 11 std::cout << i << " : " << env[i] << std::endl;12 } 13 return 0;14 }

传递自己的环境变量表
execle函数不仅可以传递系统的环境变量表,也可以传递自己构造的环境变量表。
    1 #include <stdio.h>2 #include <unistd.h>3 #include <stdlib.h>4 #include <sys/types.h>5 #include <sys/wait.h>6 7 extern char **environ;8 9 int main()10 {
W> 11     char *const myenv[] ={
W> 12         "MYVAL1=11111111111111",
W> 13         "MYVAL2=11111111111111",
W> 14         "MYVAL3=11111111111111",
W> 15         "MYVAL4=11111111111111",16         NULL                    17     };
W> 18     char *env_val = "MYVAL5=5555555555555555555555555";19     putenv(env_val);            20     pid_t id = fork();          21     if(id == 0)                 22     {                           23         printf("pid: %d, exec command begin\n", getpid());24         execle("./mytest", "mytest","-a" , "-b", NULL ,environ);25         exit(1);                26     }                           27     else{                       28         // father               29         pid_t rid = waitpid(-1, NULL, 0);30         if(rid > 0)             31         {                       32             printf("wait success, rid: %d\n", rid);33         }                       34     }                           35     return 0;                   36 }
事实上,只有execve是真正的系统调用,其它五个函数最终都调用 execve,所以execve在man手册 第2节,其它函数在man手册第3节。这些函数之间的关系如下图所示。
下图exec函数族 一个完整的例子:

自定义简易的shell
前面的文章我们说过我们的指令是无法直接对操作系统进行操作的,需要命令行解释器;况且我们输入的指令也是一个进程;因此当我们输入一个指令的时候,命令行解释器fork一个子进程使用程序替换来执行我们的指令,再结合上篇文章我们是不是实现了一个只执行了一次的命令行解释器。根据这个原理,将这个进程循环下去是不是就是一个简易的shell?
获取主机、使用者、工作目录

当我们登录我们的云服务器时,操作系统会自动生成一份当前用户的环境变量表;这份环境变量表中包含我们需要的东西,我们可以使用系统调用getenv()来获取这些信息;
const char *getUsername()
{const char *name = getenv("USER");if(name) return name;else return "none";
}
const char *getHostname()
{const char *hostname = getenv("HOSTNAME");if(hostname) return hostname;else return "none";
}
const char *getCwd()
{const char *cwd = getenv("PWD");if(cwd) return cwd;else return "none";
}
获取命令
注意:获取命令肯定是获取字符串,获取字符串就避免不了我们会输入空格;因此就不可以使用scanf()函数来获取;必须使用fgets函数。
int getUserCommand(char *command, int num)
{printf("[%s@%s %s]# ", getUsername(), getHostname(), getCwd());char *r = fgets(command, num, stdin);if(r == NULL) return -1;// "abcd\n" "\n"command[strlen(command) - 1] = '\0';return strlen(command);
}
这里我们获取到字符串的最后一定一定会输入一个回车,因此我们要将字符串的最后一个字符设置为0,方便下面的切割。
切割分解命令
SEP是我们定义的一个宏,实际是只有一个空格的字符串;使用strtok()库函数可以将我们输入的命令按照空格切割开来。再将切割好的每个字符串放到一个数组中。
void commandSplit(char *in, char *out[])
{int argc = 0;out[argc++] = strtok(in, SEP);while( out[argc++] = strtok(NULL, SEP));#ifdef Debugfor(int i = 0; out[i]; i++){printf("%d:%s\n", i, out[i]);}
}
创建子进程执行命令
通过上面的函数我们获得了我们要执行的命令和执行该命令的附加选项,并切割成一个数组;接下来就是要进行程序替换,可是那么多程序替换函数我们到底使用哪一个呢?
使用execvp函数替换,这个函数的第一个参数是要执行的命令,刚好是我们这个数组的第一个元素;第二个参数是可执行程序命令行参数形式形成的指针数组,刚好是我们这个数组;
int execute(char *argv[])
{pid_t id = fork();if(id < 0) return -1;else if(id == 0) //child{// exec commandexecvp(argv[0], argv); // cd ..exit(1);}else // father{int status = 0;pid_t rid = waitpid(id, &status, 0);if(rid > 0){lastcode = WEXITSTATUS(status);}}return 0;
}
内建命令的特殊处理
把上面的代码放到一个while循环中,编译运行代码其实已经可以完成一些指令了;但是当我么输入执行cd、export、echo时。我们会发现根本没有用,因为这些命令是我们之前提到的内建命令,这些命令的特殊之处就是要bash自己执行。
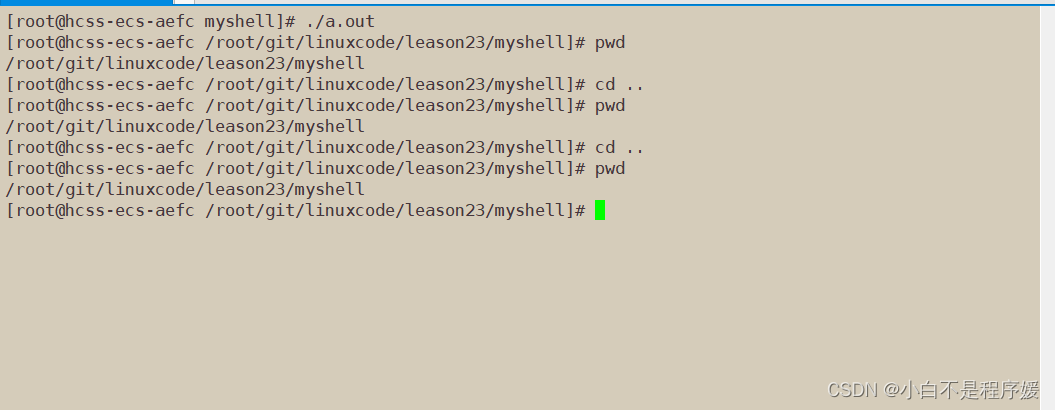
因此我们要在执行命令前判断是不是内建命令;这里只实现极个别内建命令。
char *homepath()
{char *home = getenv("HOME");if(home) return home;else return (char*)".";
}
void cd(const char *path)
{chdir(path);char tmp[1024];getcwd(tmp, sizeof(tmp));sprintf(cwd, "PWD=%s", tmp); // bugputenv(cwd);
}// 什么叫做内键命令: 内建命令就是bash自己执行的,类似于自己内部的一个函数!
// 1->yes, 0->no, -1->err
int doBuildin(char *argv[])
{if(strcmp(argv[0], "cd") == 0){char *path = NULL;if(argv[1] == NULL) path=homepath();else path = argv[1];cd(path);return 1;}else if(strcmp(argv[0], "export") == 0){if(argv[1] == NULL) return 1;strcpy(enval, argv[1]);putenv(enval); // ???return 1;}else if(strcmp(argv[0], "echo") == 0){if(argv[1] == NULL){printf("\n");return 1;}if(*(argv[1]) == '$' && strlen(argv[1]) > 1){ char *val = argv[1]+1; // $PATH $?if(strcmp(val, "?") == 0){printf("%d\n", lastcode);lastcode = 0;}else{const char *enval = getenv(val);if(enval) printf("%s\n", enval);else printf("\n");}return 1;}else {printf("%s\n", argv[1]);return 1;}}else if(0){}return 0;
}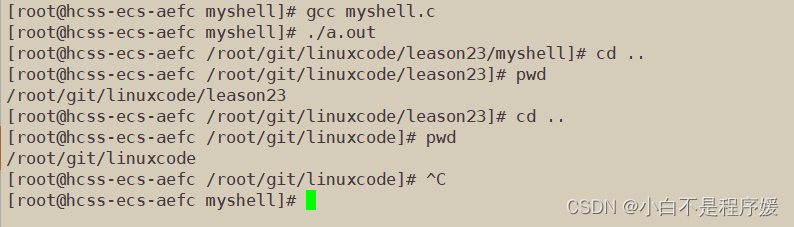
Linux中还有很多内建命令,就不一一实现了;大家有兴趣的话可以自己尝试的添加下。到此我们简易的shell就编写完成了,下面是完整代码。
完整代码
#include <stdio.h>
#include <stdlib.h>
#include <string.h>
#include <unistd.h>
#include <sys/types.h>
#include <sys/wait.h>#define NUM 1024
#define SIZE 64
#define SEP " "
//#define Debug 1char cwd[1024];
char enval[1024]; // for test
int lastcode = 0;char *homepath()
{char *home = getenv("HOME");if(home) return home;else return (char*)".";
}const char *getUsername()
{const char *name = getenv("USER");if(name) return name;else return "none";
}
const char *getHostname()
{const char *hostname = getenv("HOSTNAME");if(hostname) return hostname;else return "none";
}
const char *getCwd()
{const char *cwd = getenv("PWD");if(cwd) return cwd;else return "none";
}
int getUserCommand(char *command, int num)
{printf("[%s@%s %s]# ", getUsername(), getHostname(), getCwd());char *r = fgets(command, num, stdin); // 最终你还是会输入\nif(r == NULL) return -1;// "abcd\n" "\n"command[strlen(command) - 1] = '\0'; // 有没有可能越界?不会return strlen(command);
}void commandSplit(char *in, char *out[])
{int argc = 0;out[argc++] = strtok(in, SEP);while( out[argc++] = strtok(NULL, SEP));#ifdef Debugfor(int i = 0; out[i]; i++){printf("%d:%s\n", i, out[i]);}
#endif
}int execute(char *argv[])
{pid_t id = fork();if(id < 0) return -1;else if(id == 0) //child{// exec commandexecvp(argv[0], argv); // cd ..exit(1);}else // father{int status = 0;pid_t rid = waitpid(id, &status, 0);if(rid > 0){lastcode = WEXITSTATUS(status);}}return 0;
}void cd(const char *path)
{chdir(path);char tmp[1024];getcwd(tmp, sizeof(tmp));sprintf(cwd, "PWD=%s", tmp); // bugputenv(cwd);
}// 什么叫做内键命令: 内建命令就是bash自己执行的,类似于自己内部的一个函数!
// 1->yes, 0->no, -1->err
int doBuildin(char *argv[])
{if(strcmp(argv[0], "cd") == 0){char *path = NULL;if(argv[1] == NULL) path=homepath();else path = argv[1];cd(path);return 1;}else if(strcmp(argv[0], "export") == 0){if(argv[1] == NULL) return 1;strcpy(enval, argv[1]);putenv(enval); // ???return 1;}else if(strcmp(argv[0], "echo") == 0){if(argv[1] == NULL){printf("\n");return 1;}if(*(argv[1]) == '$' && strlen(argv[1]) > 1){ char *val = argv[1]+1; // $PATH $?if(strcmp(val, "?") == 0){printf("%d\n", lastcode);lastcode = 0;}else{const char *enval = getenv(val);if(enval) printf("%s\n", enval);else printf("\n");}return 1;}else {printf("%s\n", argv[1]);return 1;}}else if(0){}return 0;
}int main()
{while(1){char usercommand[NUM];char *argv[SIZE];// 1. 打印提示符&&获取用户命令字符串获取成功int n = getUserCommand(usercommand, sizeof(usercommand));if(n <= 0) continue;// 2. 分割字符串// "ls -a -l" -> "ls" "-a" "-l"commandSplit(usercommand, argv);// 3. check build-in commandn = doBuildin(argv);if(n) continue;// 4. 执行对应的命令execute(argv);}
}
这篇文章到此我们就翻过Linux的第一座大山——进程控制;从冯诺依曼体系结构到现在,有关Linux中进程的相关介绍已经完结,大家可以看看前面的文章温习温习。从下篇文章开始我们将开始介绍Linux的第二座大山——文件系统。
今天对Linux下自定义简易shell的分享到这就结束了,希望大家读完后有很大的收获,也可以在评论区点评文章中的内容和分享自己的看法;个人主页还有很多精彩的内容。您三连的支持就是我前进的动力,感谢大家的支持!!!