C++从小白到初级工程师【个人学习笔记】

目录
- 1.背景
- 2.基础
- 二维数组
- 概念
- 二维数组定义方式
- 二维数组数组名称
- 概念
- 例子
- 函数的分文件编写
- 概念
- 示例
- 指针
- 指针的基本概念
- 指针变量的定义和使用
- 空指针和野指针
- 空指针实例
- 野指针实例
- const修饰指针
- 概念
- const修饰指针 --- 常量指针
- 指针和数组
- 作用
- 示例
- 指针和函数
- 作用
- 示例
- 指针、数组、函数
- 题目
- 代码实现
- 结构体
- 结构体基本概念
- 结构体定义和使用
- 实例
- 结构体数组
- 概念
- 例子
- 结构体指针
- 概念
- 示例
- 结构体嵌套结构体
- 概念
- 示例
- 结构体做函数参数
- 概念
- 示例
1.背景
C++作为能和计算机硬件打交道的语言,在计算机世界中具有重要意义。在Android 应用层的JNI开发中,Android framework层、驱动层、kernel层均使用广泛。
相应的,如果想对Android系统漏洞和安全防护有更多了解,对C++的了解是必不可少的。
本文是笔者对于自己系统学习C++语言的记录。
2.基础
二维数组
概念
二维数组就是在一维数组上,多加一个维度。
二维数组定义方式
#include <iostream>
using namespace std;int main() {//方式1  //数组类型 数组名 [行数][列数]int arr[2][3];arr[0][0] = 1;arr[0][1] = 2;arr[0][2] = 3;arr[1][0] = 4;arr[1][1] = 5;arr[1][2] = 6;for (int i = 0; i < 2; i++){for (int j = 0; j < 3; j++){cout << arr[i][j] << " ";}cout << endl;}//方式2 //数据类型 数组名[行数][列数] = { {数据1,数据2 } ,{数据3,数据4 } };int arr2[2][3] ={{1,2,3},{4,5,6}};//方式3//数据类型 数组名[行数][列数] = { 数据1,数据2 ,数据3,数据4  };int arr3[2][3] = { 1,2,3,4,5,6 }; //方式4 //数据类型 数组名[][列数] = { 数据1,数据2 ,数据3,数据4  };int arr4[][3] = { 1,2,3,4,5,6 };
}

二维数组数组名称
概念
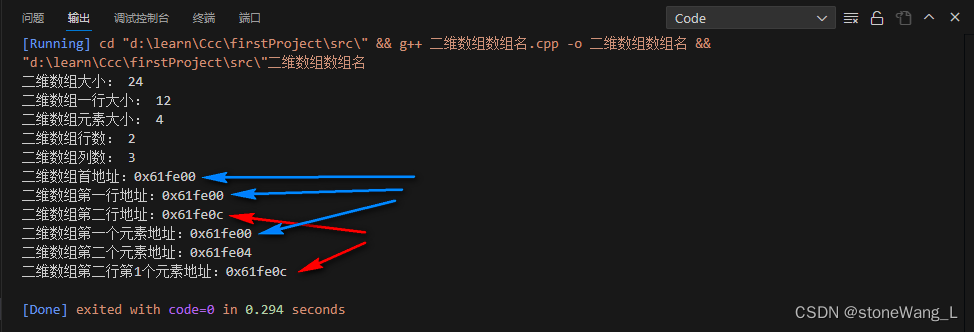
- 查看二维数组所占内存空间
- 获取二维数组首地址
例子
#include <iostream>
using namespace std;int main() {//二维数组数组名int arr[2][3] ={{1,2,3},{4,5,6}};cout << "二维数组大小: " << sizeof(arr) << endl;cout << "二维数组一行大小: " << sizeof(arr[0]) << endl;cout << "二维数组元素大小: " << sizeof(arr[0][0]) << endl;cout << "二维数组行数: " << sizeof(arr) / sizeof(arr[0]) << endl;cout << "二维数组列数: " << sizeof(arr[0]) / sizeof(arr[0][0]) << endl;//地址(二维数组的数组名就是指针)cout << "二维数组首地址:" << arr << endl;cout << "二维数组第一行地址:" << arr[0] << endl;cout << "二维数组第二行地址:" << arr[1] << endl;// 查看单独的一个数,需要加取地址符&cout << "二维数组第一个元素地址:" << &arr[0][0] << endl;cout << "二维数组第二个元素地址:" << &arr[0][1] << endl;cout << "二维数组第二行第1个元素地址:" << &arr[1][0] << endl;return 0;
}
函数的分文件编写
概念
作用:让代码结构更加清晰
函数分文件编写一般有4个步骤
- 创建后缀名为.h的头文件
- 创建后缀名为.cpp的源文件
- 在头文件中写函数的声明
- 在源文件中写函数的定义
示例
//swap.h文件
#include<iostream>
using namespace std;//实现两个数字交换的函数声明
void swap(int a, int b);
//swap.cpp文件
#include "swap.h"void swap(int a, int b)
{int temp = a;a = b;b = temp;cout << "a = " << a << endl;cout << "b = " << b << endl;
}
//main函数文件
#include "swap.h"
int main() {int a = 100;int b = 200;swap(a, b);system("pause");return 0;
}
指针
指针的基本概念
指针的作用:可以通过指针间接访问内存
- 内存编号是从0开始记录的,一般用十六进制数字表示
- 可以利用指针变量保存地址
指针变量的定义和使用
int main() {//1、指针的定义int a = 10; //定义整型变量a//指针定义语法: 数据类型 * 变量名 ;int * p;//指针变量赋值p = &a; //指针指向变量a的地址cout << &a << endl; //打印数据a的地址cout << p << endl;  //打印指针变量p//2、指针的使用//通过*操作指针变量指向的内存cout << "*p = " << *p << endl;system("pause");return 0;
}
指针变量和普通变量的区别
- 普通变量存放的是数据,指针变量存放的是地址
- 指针变量可以通过" * "操作符,操作指针变量指向的内存空间,这个过程称为解引用
总结1: 我们可以通过 & 符号 获取变量的地址
总结2:利用指针可以记录地址
总结3:对指针变量解引用,可以操作指针指向的内存
空指针和野指针
空指针:指针变量指向内存中编号为0的空间
用途:初始化指针变量
注意:空指针指向的内存是不可以访问的
空指针实例
#include<iostream>
using namespace std;int main() {//指针变量p指向内存地址编号为0的空间int *p = NULL;//访问空指针报错 //内存编号0 ~255为系统占用内存,不允许用户访问cout << "*p==" << *p << endl;return 0;
}

野指针:指针变量指向非法的内存空间
野指针实例
#include <iostream>
using namespace std;int main() {//指针变量p指向内存地址编号为0x1100的空间int * p = (int *)0x1100;//访问野指针报错 cout << *p << endl;return 0;
}

总结:空指针和野指针都不是我们申请的空间,因此不要访问。
const修饰指针
概念
const修饰指针有三种情况
- const修饰指针 — 常量指针
- const修饰常量 — 指针常量
- const即修饰指针,又修饰常量
const修饰指针 — 常量指针
#include<iostream>
using namespace std;int main() {int a = 10;int b = 10;//const修饰的是指针,指针指向可以改,指针指向的值不可以更改const int * p1 = &a; p1 = &b; //正确//*p1 = 100;  报错//const修饰的是常量,指针指向不可以改,指针指向的值可以更改int * const p2 = &a;//p2 = &b; //错误*p2 = 100; //正确//const既修饰指针又修饰常量const int * const p3 = &a;//p3 = &b; //错误//*p3 = 100; //错误return 0;
}
技巧:看const右侧紧跟着的是指针还是常量, 是指针就是常量指针,是常量就是指针常量
指针和数组
作用
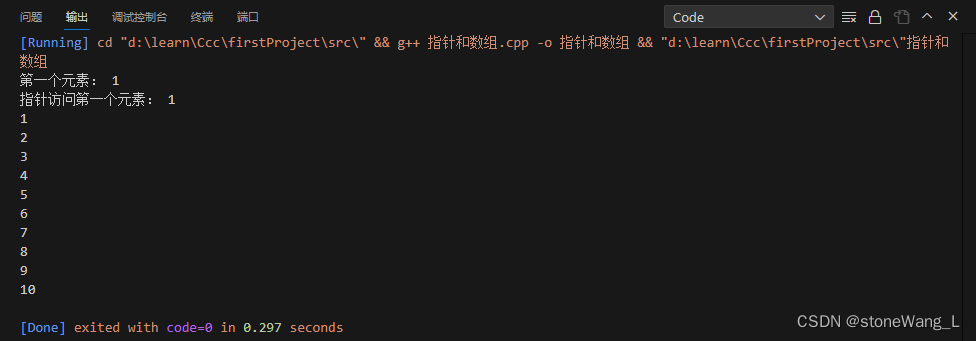
利用指针访问数组中元素
示例
#include<iostream>
using namespace std;int main() {int arr[] = { 1,2,3,4,5,6,7,8,9,10 };int * p = arr;  //指向数组的指针cout << "第一个元素: " << arr[0] << endl;cout << "指针访问第一个元素: " << *p << endl;for (int i = 0; i < 10; i++){//利用指针遍历数组cout << *p << endl;p++;}return 0;
}
指针和函数
作用
利用指针作函数参数,可以修改实参的值
示例
#include<iostream>
using namespace std;//值传递
void swap1(int a ,int b)
{int temp = a;a = b; b = temp;
}
//地址传递
void swap2(int * p1, int *p2)
{int temp = *p1;*p1 = *p2;*p2 = temp;
}int main() {int a = 10;int b = 20;swap1(a, b); // 值传递不会改变实参cout << "a = " << a << endl;cout << "b = " << b << endl;swap2(&a, &b); //地址传递会改变实参cout << "a = " << a << endl;cout << "b = " << b << endl;return 0;
}

总结:如果不想修改实参,就用值传递,如果想修改实参,就用地址传递
指针、数组、函数
题目
封装一个函数,利用冒泡排序,实现对整型数组的升序排序
例如数组:int arr[10] = { 4,3,6,9,1,2,10,8,7,5 };
代码实现
#include<iostream>
using namespace std;//冒泡排序函数
void bubbleSort(int *arr, int len)  //int * arr 也可以写为int arr[]
{for (int i = 0; i < len - 1; i++) //次数{for (int j = 0; j < len - 1 - i; j++) // 单次的下标数{if (arr[j] > arr[j+1]){int temp = arr[j];arr[j] = arr[j+1];arr[j+1] = temp;}}}}//打印数组函数
void printArray(int arr[], int len)
{for (int i = 0; i < len; i++){cout << arr[i] << endl;}}int main() {int arr[10] = {4,3,6,9,1,2,10,8,7,5};int len = sizeof(arr) / sizeof(int);bubbleSort(arr, len);printArray(arr, len);return 0;
}
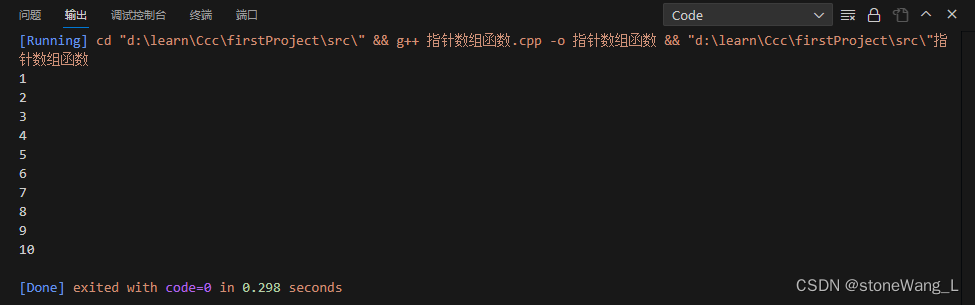
总结:当数组名传入到函数作为参数时,被退化为指向首元素的指针
结构体
结构体基本概念
结构体属于用户自定义的数据类型,允许用户存储不同的数据类型
结构体定义和使用
语法 struct 结构体名 { 结构体成员列表 };
通过结构体创建变量的方式有三种:
- struct 结构体名 变量名
- struct 结构体名 变量名 = { 成员1值 , 成员2值…}
- 定义结构体时顺便创建变量
实例
#include<iostream>
using namespace std;struct student
{//成员列表string name;  //姓名int age;      //年龄int score;    //分数
}stu3; // 结构体变量创建方式3 int main() {//结构体变量创建方式1struct student stu1; //struct 关键字可以省略stu1.name = "张三";stu1.age = 18;stu1.score = 100;cout << "姓名:" << stu1.name << " 年龄:" << stu1.age  << " 分数:" << stu1.score << endl;//结构体变量创建方式2struct student stu2 = {"李四",19,60};cout << "姓名:" << stu2.name << " 年龄:" << stu2.age  << " 分数:" << stu2.score << endl;// stu3stu3.name = "王五";stu3.age = 18;stu3.score = 80;cout << "姓名:" << stu3.name << " 年龄:" << stu3.age  << " 分数:" << stu3.score << endl;return 0;
}

总结1:定义结构体时的关键字是struct,不可省略
总结2:创建结构体变量时,关键字struct可以省略
总结3:结构体变量利用操作符 ‘’.‘’ 访问成员
结构体数组
概念
作用:将自定义的结构体放入到数组中方便维护
语法: struct 结构体名 数组名[元素个数] = { {} , {} , ... {} }
例子
#include<iostream>
using namespace std;//1、结构体定义
struct student
{//成员列表string name;  //姓名int age;      //年龄int score;    //分数
};int main() {// 2、创建结构体数组struct student arr[3] = {{"张三", 18, 100},{"赵四", 19, 60 },{"王五", 20, 70}};// 3.给结构体数组中的元素赋值arr[2].name = "赵六";arr[2].age = 60;arr[2].score = 90;for (int i = 0; i < 3; i++){cout << "姓名:" << arr[i].name << " 年龄:" << arr[i].age << " 分数:" << arr[i].score << endl;}return 0;
}

结构体指针
概念
通过指针访问结构体中的成员
- 利用操作符
->可以通过结构体指针访问结构体属性
示例
#include <iostream>
using namespace std;struct student
{//成员列表string name;  //姓名int age;      //年龄int score;    //分数
};
int main() {// 1、创建学生结构体变量student s = {"张三", 18, 100};// 2、通过指针指向结构体变量student *p = &s;// 3、通过指针访问结构体变量中的数据cout << " 姓名:" << p->name<< " 年龄:" << (*p).age<< " 分数:" << p->score << endl;return 0;
}

总结:结构体指针可以通过 -> 操作符 来访问结构体中的成员
结构体嵌套结构体
概念
作用: 结构体中的成员可以是另一个结构体
例如:每个老师辅导一个学员,一个老师的结构体中,记录一个学生的结构体
示例
#include <iostream>
using namespace std;// 定义学生结构体
struct student
{string name;  //姓名int age;      //年龄int score;    //分数
};// 定义老师结构体
struct teacher
{int id; // 教师编号string name; // 教师姓名int age; // 年龄struct student stu; // 辅导的学生
};int main() {// 结构体嵌套结构体// 创建老师teacher t;t.id = 10000;t.name = "老王";t.age = 50;t.stu.name = "小王";t.stu.age = 20;t.stu.score = 60;cout << "教师 职工编号: " << t.id << " 姓名: " << t.name << " 年龄: " << t.age << endl;cout << "辅导学员 姓名: " << t.stu.name << " 年龄:" << t.stu.age << " 考试分数: " << t.stu.score << endl;return 0;
}

结构体做函数参数
概念
**作用:**将结构体作为参数向函数中传递
传递方式有两种:
- 值传递
- 地址传递
示例
#include <iostream>
using namespace std;//学生结构体定义
struct student
{//成员列表string name;  //姓名int age;      //年龄int score;    //分数
};//值传递
void printStudent(student stu)
{stu.age = 28;cout << "子函数中 姓名:" << stu.name << " 年龄: " << stu.age  << " 分数:" << stu.score << endl;
}//地址传递
void printStudent2(student *stu)
{stu->age = 28;cout << "子函数中 姓名:" << stu->name << " 年龄: " << stu->age  << " 分数:" << stu->score << endl;
}int main() {student stu = { "张三",18,100};//值传递printStudent(stu);cout << "主函数中 姓名:" << stu.name << " 年龄: " << stu.age << " 分数:" << stu.score << endl;student stu2 = { "赵四",18,100};//地址传递printStudent2(&stu2);cout << "主函数中 姓名:" << stu2.name << " 年龄: " << stu2.age  << " 分数:" << stu2.score << endl;return 0;
}
