docker 安装及配置 nginx + tomcat(四):高可用
:高可用)
文章目录
- 1. 引言
- 2. 高可用架构
- 3. 实际步骤
- 3.1 虚拟机新建系统
- 3.2 安装 keepalived
- 3.3 配置 keepalived
- 3.4 启动 keepalived
- 3.5 验证高可用
- 3.5.1 查看当前效果
- 3.5.2 模拟灾难
- 4 参考
1. 引言
前情提要:
《docker 安装及配置 nginx + tomcat(一):基础安装》
《docker 安装及配置 nginx + tomcat(二):负载均衡》
《docker 安装及配置 nginx + tomcat(三):动静分离》
本文主要描述在在 nginx + tomcat 基础上实现高可用。
2. 高可用架构
高可用(High Availability,简称HA)是分布式系统架构设计中必须考虑的因素之一,它通常是指通过设计减少系统不能提供服务的时间。高可用的主要目的是为了保障“业务的连续性”,即在用户眼里,业务永远是正常对外提供服务的。
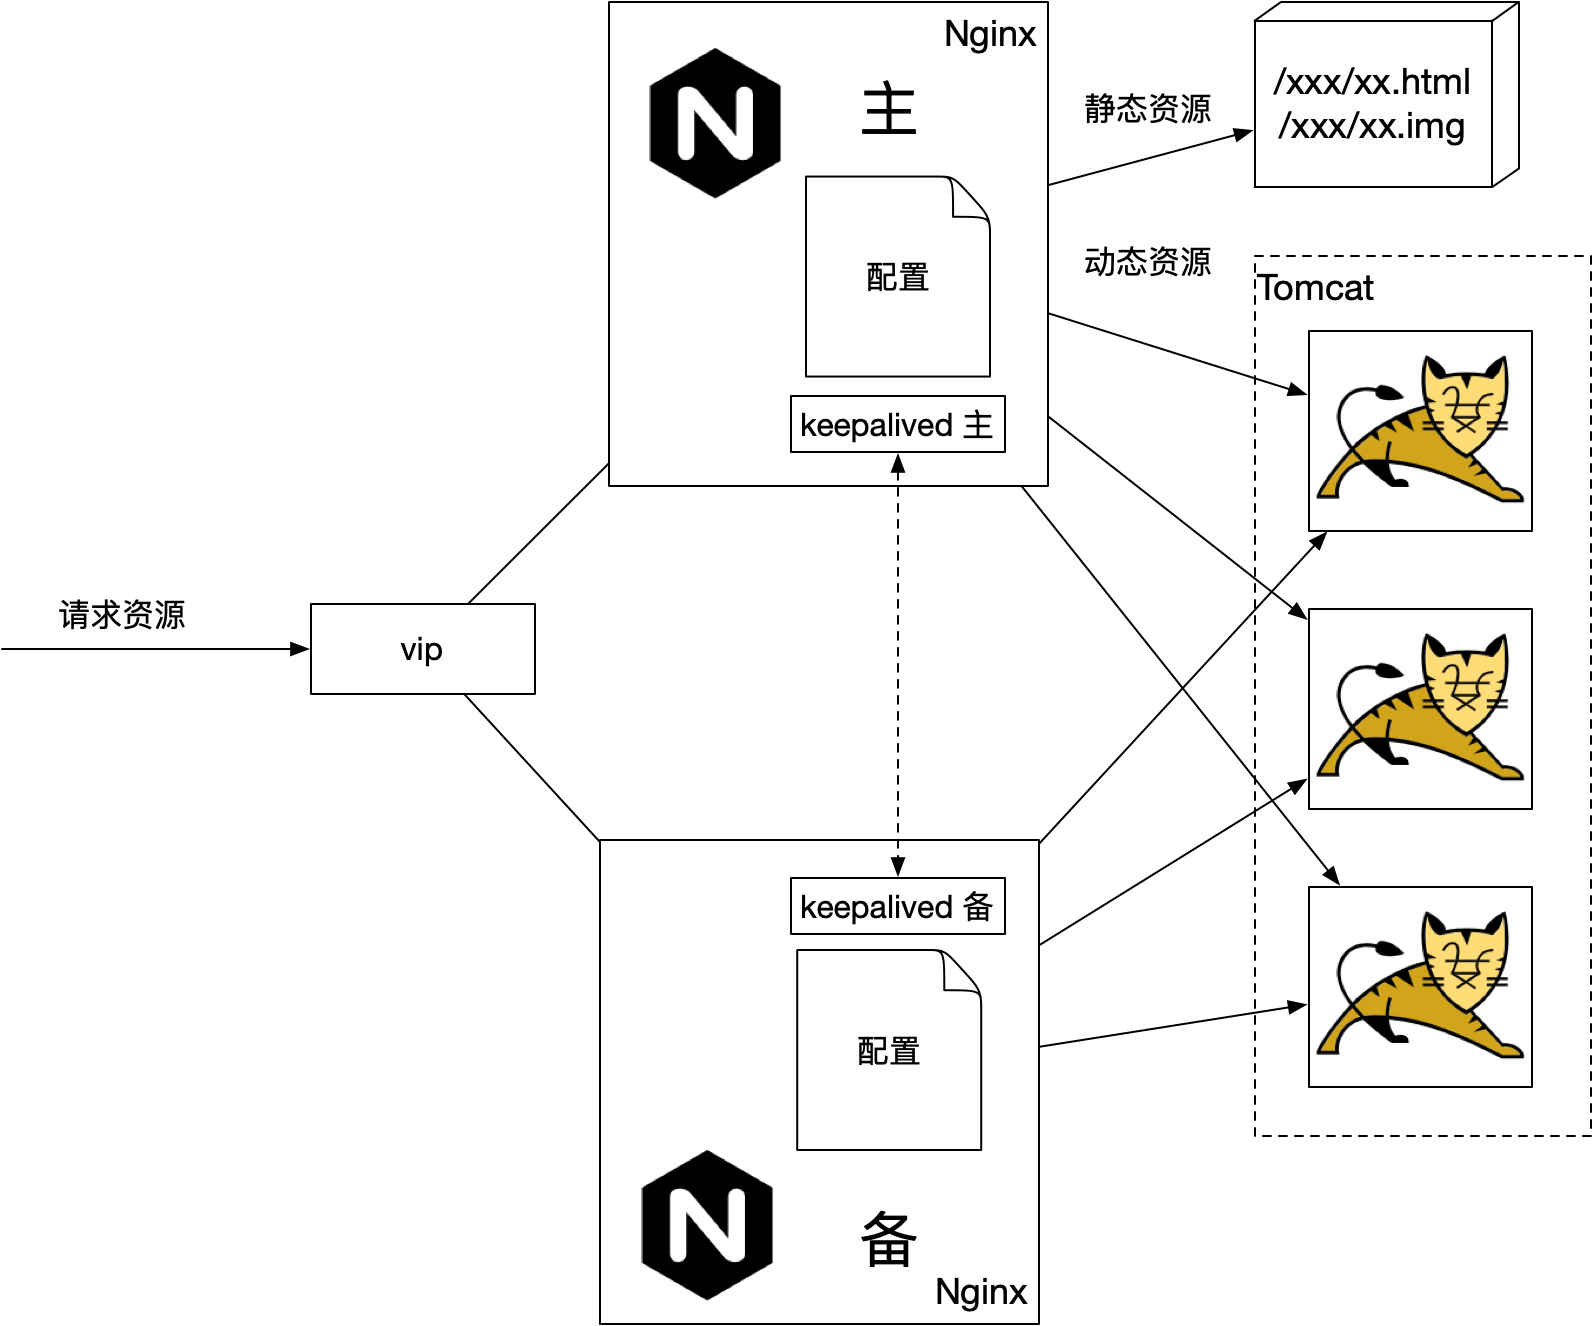
对于我们这里就是避免单点故障,当某个 nginx 服务器出现问题之后可以切到到其他的 nginx 服务。
先看下最终的架构图:
3. 实际步骤
3.1 虚拟机新建系统
为了模拟高可用的场景,需要在两台机器上模拟,在虚拟机上再开一台机器,作为 nginx 备服务器,如果在阿里云或者其他服务器上有两台机器也可以模拟。
Mac 系统可以参考这篇文章 《Mac VMware Fusion 安装 Centos 系统》 用虚拟机再来开一台机器。
在新的机器上,参考 《docker 安装及配置 nginx + tomcat(一):基础安装》 安装 docker,nginx 等(tomcat 可不安装),并启动 nginx 容器。
新机器的 nginx 配置如下:
# 高可用
upstream testservers {server 172.16.2.128:8080; # 指向之前实际的 tomcat 服务器1,如果不需要,可以去掉server 172.16.2.128:8081; # 指向之前实际的 tomcat 服务器2,如果不需要,可以去掉server 172.16.2.128:8082; # 指向之前实际的 tomcat 服务器3,如果不需要,可以去掉
}
server {listen       80;listen  [::]:80;server_name  172.16.2.129;  # 当前新机器的主机 ip#access_log  /var/log/nginx/host.access.log  main;location = / {root   /usr/share/nginx/html;proxy_pass http://testservers;index  index.html index.htm;}location ^~ /static {root /data/;index index.html;}location / {proxy_pass http://testservers;}#error_page  404              /404.html;# redirect server error pages to the static page /50x.html#error_page   500 502 503 504  /50x.html;location = /50x.html {root   /usr/share/nginx/html;}# proxy the PHP scripts to Apache listening on 127.0.0.1:80##location ~ \.php$ {#    proxy_pass   http://127.0.0.1;#}# pass the PHP scripts to FastCGI server listening on 127.0.0.1:9000##location ~ \.php$ {#    root           html;#    fastcgi_pass   127.0.0.1:9000;#    fastcgi_index  index.php;#    fastcgi_param  SCRIPT_FILENAME  /scripts$fastcgi_script_name;#    include        fastcgi_params;#}# deny access to .htaccess files, if Apache's document root# concurs with nginx's one##location ~ /\.ht {#    deny  all;#}
}
注意 nginx 配置修改了后,记得重启服务,否则不生效!
# 在容器里
nginx -s reload
# 在容器外
docker exec -it nginx nginx -s reload
3.2 安装 keepalived
在主、备机器上均需下载 keepalived,如下:
yum install -y keepalived       # CentOS 7 / RHEL 7
dnf install -y keepalived       # CentOS 8 / RHEL 8
3.3 配置 keepalived
在主机器上,/etc/keepalived/keepalived.conf 上配置如下:
! Configuration File for keepalivedglobal_defs {router_id node01  # 路由 id: 当前安装 keepalived 节点主机的标识符,全局唯一vrrp_skip_check_adv_addrvrrp_strictvrrp_garp_interval 0vrrp_gna_interval 0
}vrrp_script check_nginx {script "/etc/keepalived/check_nginx.sh" # 检查 nginx 是否正常工作的脚本interval 2 # 脚本检测间隔,单位为秒weight -10fall 3 	# 连续检测3次失败就算失败,每次失败优先级减去 weight 的值rise 2 	# 连续检测2次成功就算成功
}vrrp_instance VI_1 {state MASTER		# 表示当前为 ngxin 的主节点,masterinterface ens160	# 当前实例绑定的网卡名称: ifconfig 或者 ip a 可以查看virtual_router_id 51 # 虚拟路由 id,保证主备节点一致priority 100 		# 优先级,主的优先级设置的应该比备高advert_int 1		# 主备之间同步检查的时间间隔,默认1sauthentication {	# 认证授权的密码auth_type PASSauth_pass 1111}# vip,保证主备一致,且最好跟主机 ip 在同一个网段下,例如我的主机 ip 是 172.16.2.128virtual_ipaddress {	172.16.2.120}# 检查的脚本track_script {check_nginx}
}
在备机器下,/etc/keepalived 上配置如下:
! Configuration File for keepalivedglobal_defs {router_id node02  # 路由 id: 当前安装 keepalived 节点主机的标识符,全局唯一vrrp_skip_check_adv_addrvrrp_strictvrrp_garp_interval 0vrrp_gna_interval 0
}vrrp_script check_nginx {script "/etc/keepalived/check_nginx.sh" # 检查 nginx 是否正常工作的脚本interval 2 # 脚本检测间隔,单位为秒weight -10fall 3 	# 连续检测3次失败就算失败,每次失败优先级减去 weight 的值rise 2 	# 连续检测2次成功就算成功
}vrrp_instance VI_1 {state BACKUP		# 表示当前为 ngxin 的主节点,backupinterface ens160	# 当前实例绑定的网卡名称: ifconfig 或者 ip a 可以查看virtual_router_id 51 # 虚拟路由 id,保证主备节点一致priority 90 		# 优先级,主的优先级设置的应该比备高advert_int 1		# 主备之间同步检查的时间间隔,默认1sauthentication {	# 认证授权的密码auth_type PASSauth_pass 1111}# vip,保证主备一致,且最好跟主机 ip 在同一个网段下,例如我的主机 ip 是 172.16.2.129virtual_ipaddress {	172.16.2.120}# 检查的脚本track_script {check_nginx}
}
主、备的区别在于 router_id、state、priority 的配置。
主、备机器都需要放置检测脚本 /etc/keepalived/nginx_check.sh ,内容如下:
A=`curl localhost:80/index.html --connect-timeout 3`
if [ $A -eq 0 ]; thenps -ef|grep keepalived|grep -v grep|awk '{print $2}'|xargs kill -9
fi
3.4 启动 keepalived
主、备机器,都需执行如下命令:
systemctl start keepalived.service
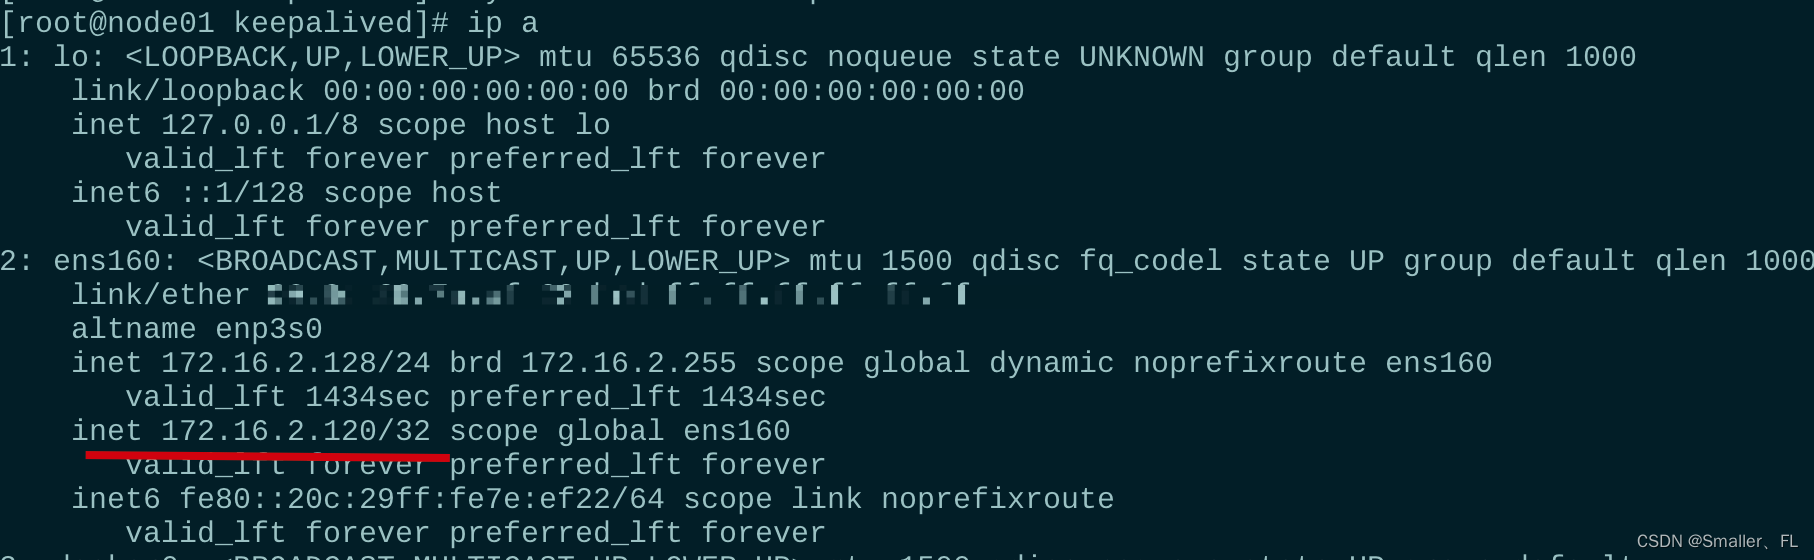
查看 vip 是否生效:
ip a
# 或者
ifconfig
3.5 验证高可用
3.5.1 查看当前效果
通过 keepalived 设置的 vip 访问,注意我这里是配置了负载均衡,后端有3个 tomcat 服务器,如果想达到同样的效果,请参考前两章的内容。如果没有配置 tomcat 服务器,请直接访问 vip 即可,不用带上 /test/test.html
以下是通过 vip 结合负载均衡的效果:



3.5.2 模拟灾难
停止主机房的 nginx 容器
docker stop nginx

停止之后,整体架构退化成如下:

停止容器之后,由于 keepalived 脚本无法访问 nginx 服务异常,自动切换到备机器。此时还是访问 vip,注意服务是否中断。

服务依然正常,说明高可用已经生效。
4 参考
《docker 安装及配置 nginx + tomcat(一):基础安装》
《docker 安装及配置 nginx + tomcat(二):负载均衡》
《docker 安装及配置 nginx + tomcat(三):动静分离》